Here's my easy recipe to try. The recipe is for preparing about a kilo of fresh fish....between 2 and 2 1/2 pounds. That's about the size of a regular salmon fillet.
INGREDIENTS
2 - 2 1/2 pounds of fresh salmon (you can use frozen, but it's not as good as fresh)
4 pounds of brown sugar (light or dark...your choice)
2 cups of table salt or kosher salt
Wood chips...your choice of flavor (I used Hickory wood)
I prefer to start the project in the late afternoon or early evening, so the fish is ready to smoke the following morning. Before you begin, check the salmon fillet, running your hand over it, looking for any small bones. If you find small bones, this is a good time to remove them with tweezers or small needle nose pliers.
BRINE
First step is making the brine. The salt in the brine is going to cure or preserve the fish, while the brown sugar will give a hint of sweetness to the finished fish.
In a large bowl, pour 4 pounds of brown sugar. Add 2 cups of table or kosher salt. Nothing fancy at this point, just put your freshly washed hands into the mix and mix it up well. When thoroughly mixed, the salt should disappear into the brown sugar and not really be visible.
Begin with a shallow pan. I buy one of the cheap aluminum roasting pans, made for one time use and meant to be thrown away rather than washed out. They are less than a dollar at most stores.
Begin by pouring the brine mix into the bottom of the pan. Put enough in the pan so the bottom is completely covered when you pat the brine down flat with your hand. Make sure it is completely covered with brine. Place your pieces of salmon on top of the brine....skin side down. Leave space between the pieces of salmon, as you want to be sure the brine covers every bit of the fish. With the fish in place, sprinkle brine mix into the gaps between the pieces of fish and pat it down, so the brine is making good contact with the fish. When you finish, pour the remaining brine over the top of the layer of fish and firmly pat it down. Again, make sure the fish is completely buried in the brine mix. You should not see any fish showing through. You should only see the brine.
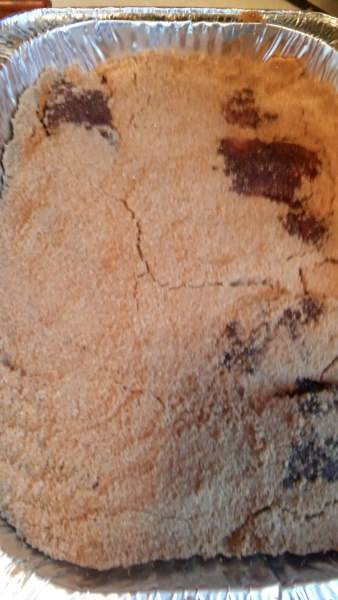
When you've finished, put the pan of fish back into the refrigerator where it should remain for between 12 and 18 hours. As the brine absorbs the moisture in the fish, you will see bits of fish peeking through the brine. The following morning, remove the pan of fish from the refrigerator and it should look something like this.
REMOVING EXCESS BRINE
Place the washed pieces of fish and set them on an oven rack, or some sort of elevated rack where the water can drip off. I use a couple of plastic trays from my food dehydrator to do that. Allow the fish to sit out on the rack for about 45 minutes, so all of the water has dripped off and the surface of the fish can dry a bit. While the fish is drying, you have time to start your smoker, using wood or charcoal. Get a good bed of hot coals, but don't overload the smoker with charcoal. You are going to smoke the fish at a reasonably low temperature. With the fish drying on the racks, it should look something like this.

Notice the slightly darker color of the fish and the shiny surface you want, after the fish is out of the brine.
READY TO SMOKE!
Having made sure the bed of hot coals is even, place a handful of water soaked wood chips into a little metal box, or wrap in tinfoil. If you wrap it in tinfoil, poke holes in the tinfoil so they smoke can fill the smoker. I just soak the wood chips in water for about half an hour before using. They will produce more smoke. Put the box or tinfoil pack of wood chips on top of the bed of hot coals. If your smoker has a water pan, add water to that, so you have more moisture for the fish during the smoking process. If you don't have a smoker and don't want to invest in one, you can make a simple one out of a large cardboard box. Send me an email and I will find instructions for making a cardboard box smoker for you. You're now ready to put the fish on the smoking rack. Place the pieces of fish on the smoker rack, leaving a little space between each piece of fish. The fish goes on the rack, skin side down.
Once the smoker cover is in place, watch the temperature until it stabilizes. You want to smoke the fish at something between 160F and 180F degrees. A lower temperature than I use with chicken. Adjust the temperature, as necessary, by adding more charcoal or wood, or by opening or closing air vents on your smoker. Allow the fish to smoke for between 3 and 4 hours. I found about 3 1/2 hours to be perfect for mine. Remove the fish from the smoker and it should have a nice deep color and smoke aroma....looking something like this.

The fish will be nice and firm but still pliable. I put the smoked fish back into the refrigerator, giving it a chance to cool. If you're planning to save some of the fish to eat over the next few weeks, you may store individual pieces in zip lock plastic bags, removing the air as you seal the bag. Even better and the fish will last longer, you can use a vacuum sealer and vacuum seal the fish in bags. Store the bagged fish in the freezer until you are ready to use it.
This recipe results in a very salty fish with a pleasant smoky flavor. It's perfect to eat with a cold glass of beer! Enjoy and if you have any questions, please feel free to email me at: stan.kain@gmail.com
No comments:
Post a Comment