Before you say, "I don't eat raw fish!," I'm going to share a recipe for a "California Roll," with no raw fish used. I live in Oklahoma and you don't dare say, "raw fish" to these people...unless maybe it would be catfish! I'll also explain about using raw fish and at this point, I want to give you an important warning!!!
IF YOU ARE GOING TO USE RAW FISH, BE SURE YOU CAN GET VERY FRESH, NEVER FROZEN, RAW TUNA OR SALMON...AS I THINK THOSE ARE BEST. DO NOT CROSS CONTAMINATE YOUR RAW FISH WITH ANYTHING ELSE AND MAKE SURE YOUR FISH IS KEPT COLD AT ALL TIMES! EVEN IF YOU HOLD IT ON CRUSHED ICE WHILE WORKING WITH IT. THE LAST THING YOU WANT TO DO IS GIVE FOOD POISONING TO YOUR GUESTS!
There are basically three different ways in which to prepare your sushi. You may prepare it with a sushi press, you may roll the sushi, or you may use something we call a "bazooka." Whichever method you use, it's very important that the rice and ingredients are very firmly packed when you finish, so your treat doesn't just fall apart in your hand. I think using the bamboo mat to roll sushi is probably the most difficult way, as it requires even pressure and some real dexterity. I have a neurological disorder which affects my hands, so for me, it's an impossibility today. Eating with chopsticks is out for the same reason, although I still use them a bit in food preparation.
As you can tell by my long explanations here, this is going to be far more than just a "recipe." This is going to be instructional, as well, since there's no way I can merely give you a recipe and expect you to come up with a satisfactory finished item! So, please bear with me while I walk you through the steps to the finished item!
Before we begin making sushi, the first thing we need to do is have some basic tools available. What you choose to use depends on whether you are going to roll or press the sushi. All of the tools are very simple, most are made of wood and are readily available, no matter where you live. Thank you, Amazon.com! All of the tools are quite inexpensive, as well. Disclaimer! I have absolutely NO connection to Amazon, Wal-Mart nor any other company. I find many items I use either at Wal-Mart, through Wal-Mart.com or from Amazon.com, where it seems one can find anything! I live in a small, rural area of Oklahoma, so much of what I get comes by mail from Amazon. If you live in a large urban area, you may be able to find the items locally. Just do whatever works best for you!
TOOLS
Rolled Sushi - If you plan to roll your sushi, you will need a bamboo mat. The mat is very similar to what you would think of as a bamboo place mat at the table. Here is an example of a Sushi Mat.
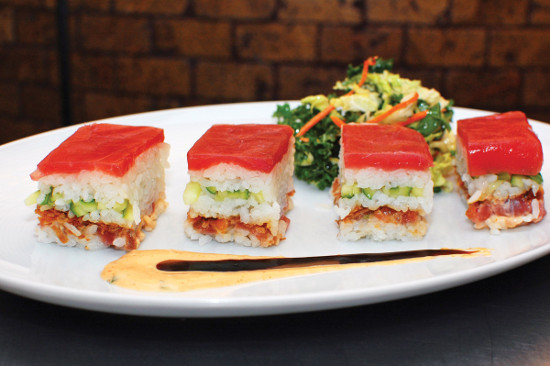
Here is an example of what you will have with rolled sushi. This is the same, if you're using a "bazooka press."

Basically, the mat is placed on a flat surface, covered with a sheet of plastic wrap. The Nori sheet (seaweed paper), if you are going to use Nori paper...is placed on top of the plastic wrap, then the rice is spread onto the surface of the Nori paper. Thinly sliced ingredients are placed on top of the rice and you begin to "roll," using firm, even pressure until you create a round roll, as shown above. Trust me, this is going to take some practice to get right!!! If you don't apply enough pressure, the sushi roll will merely fall apart. If you don't apply even pressure, it's not going to come out as a round roll. All additional instructions here will apply, no matter which method you use for making your sushi.
Pressed Sushi - Another method you may consider is to use a Sushi Press. Again, very simple to do and the press is really just a small wooden box. You may line the box with Nori paper...or not. Your choice. Again, begin by pressing some rice into the box, then you may "layer" your other ingredients, either all together or with rice between each layer. Often, a very thin slice of fresh salmon or tuna may be placed on top of the roll. When you have all your ingredients in place, you use the wooden top, supplied with the press, to apply pressure to the roll of sushi, compacting it all so you can cut the sections. The better sushi presses have slits cut in the sides, so you can cut your pieces of sushi evenly. We'll talk more about cutting, shortly. Here is an example of a sushi press.

And here are some examples of the finished product, if you're using a sushi press.


Rolled Sushi Bazooka Press - You may opt for making rolled sushi using a "Bazooka Press." This is very easy to do and if you want rolled sushi, it's probably the easiest way to go. I use a bazooka press around here much of the time. I'll be showing how to use a bazooka press in my recipe here.
Incidentally, none of the above pieces of equipment cost more than $15.00 to obtain through Amazon.com
You are also going to need a rice paddle. You need a rice paddle, no matter what you're doing with sticky rice. I use one for serving rice, as well. You will use the rice paddle for spreading or packing the rice with each method of making sushi. Likewise, the rice paddle works best when blending the sushi vinegar into the sticky rice for sushi. It's an essential tool!!! Most rice paddles, as with most other Japanese kitchen implements, is made of wood. You'll also find them made of plastic. I have both around the kitchen. They are short....about 6 to 8 inches in length. Here is a plastic rice paddle from my kitchen.

Last but not least, you will need a VERY SHARP kitchen knife with a thin blade! Sharp is the key word here! You want a quality blade which you can easily sharpen with a knife sharpener and which will hold a good edge. As I get into more Asian food recipes, the sharp kitchen knife is used for most everything! Preparing meat and vegetables for Asian dishes requires a super sharp knife, as you will be slicing the ingredients almost paper thin. I'm a "kitchen tyrant" when it comes to my special kitchen knives. NO ONE touches them! They aren't utility knives!!! They are specifically for one purpose...preparing Asian foods!
Okay...I think we have it all together now! You have the basic tools for sushi making and for preparing a lot more Asian food dishes. Let's begin making my California Roll sushi!
INGREDIENTS
2 Cups of cooked sticky rice (refer to my recipe in this blog for making sticky rice)
80 ml Sushi Vinegar (refer to my recipe in this blog for making Sushi Vinegar) Sushi Vinegar is optional but traditional.
1 Avocado
3 Sweet Baby Carrots
1 Japanese or English Cucumber (preferred but you may use any cucumber)
1 small package of Artificial Crab or Lobster (Available at most any grocery store...it's made from Pollack fish and is precooked and ready to use for salads and other dishes)
1 ounce Olive Oil
Sesame Seed (optional)
NOTE: Feel free to experiment with different ingredients. I use the above items for a reason. A slice of sushi should be put in the mouth in one bite. This gives the diner the opportunity to taste all the subtle flavors coming together on the palate and tongue. The cucumber helps with the moistness of the sushi and departs a mild but pleasant flavor. The carrot adds a bit of sweetness to the bite of sushi. Likewise, with the avocado...a mild, but not overpowering taste that enhances the flavor experience. The artificial crab is extremely mild in taste, so you don't want anything to overwhelm that flavor. With the above combination, each flavor seems to enhance and compliment the others.
PREPARING INGREDIENTS
Let the sushi making begin!!!
We'll start with your 2 cups of cooked sticky rice in a bowl. Slowly drizzle your sushi vinegar into the sticky rice, while using a "slicing" motion with the rice paddle to blend it in. You want to cool the rice at the same time, so it's fine to place a small fan near the bowl of rice to aid in the cooling. Otherwise, allow the rice time to cool after blending the sushi vinegar. You don't want to start with very hot sticky rice.
Peel the cucumber, carrots (if not already peeled when you get them) and remove the peel from the avocado. Using your sharp knife, cut the strips of artificial crab, lengthwise, in half. Cut the avocado, carrots and cucumber in long strips, as well, about 3/8ths of an inch square. You don't want any of these ingredients to be too thick, or they will be difficult to chew in the finished sushi. Nice delicate cuts will work best.
For this sushi, let's use the "Bazooka Press." Handy Tip!! Lightly coat all the internal parts of the Bazooka Press with olive oil. Just wipe it on, using a paper towel. It will aid in the sushi rice not sticking to the parts and coming out of the press quite easily. And, it won't affect the taste.
Begin by using the rice paddle to fill the open Bazooka Press with sticky rice. Fill the press fully on both halves, gently packing the rice. When you close the press, any excess rice will be squeezed out. Now, as shown in the picture below, use the plastic rod which comes with the Bazooka Press to form a deep channel in both halves of the press. Press the rod very firmly into the rice, as you want a nice, deep channel for your ingredients!
Now, you may begin placing the strips of your sushi ingredients into the channel you made in the rice. Place strips of artificial crab, avocado, cucumber and carrot into the channel, making sure the entire channel is filled. Place one layer on top of the next.
Now, you will note that the rod for the Bazooka Press has a plate on the end of it and is threaded to match the threads in the plastic tube. Lay the rod into one side of the open tube, with the threads on the rod into the threads in the tube. The plate should be right at the top of your rice and ingredient mix. Close the two halves of the hinged tube....while holding the rod in place. This is going to take some serious pressure, compacting the rice. Once you have the tube closed completely, there are two plastic snaps to lock the halves together. Excess rice will squeeze out of the sides of the tube. That's fine. There is a cap with the Bazooka press and you will place it on the open end of the Bazooka press. Hold the cap on tightly, or stand the press on end, so the cap is sitting on a flat surface. Holding the press, use one hand to hold and turn the threaded rod. The rod will screw down, further compacting the rice and ingredients. Continue until the rod has passed through the threaded part of the tube. Now, you may remove the cap from the opposite end and cut off any excess rice and ingredients sticking out the end of the tube. Using a cutting board, or flat surface, with the open end of the press on that surface, begin to slowly and firmly press the rod through the press. As you do so, a nice, firm roll of sushi will be extruded from the open end. Clean the press, rub the surfaces with some olive oil and repeat the process to make a second roll of sushi. You should easily have enough rice to make two nice sushi rolls. Put the two rolls of sushi, still on the cutting board or flat surface, into the refrigerator to chill. I like to leave them in the refrigerator for 20 to 30 minutes. This will make the sushi rolls nice and firm and easy to work with.
Removing the sushi rolls from the refrigerator, you're now ready for the Nori paper. I purchase the Nori paper in sheets, as it's easy to work with. If you need to cut it, you may do so with scissors. Just be gentle when working with it, so you don't tear it. It's quite thin. Here is the Nori paper I use. I find it at Wal-Mart in the Asian food section.

On a side note, you can also find Nori paper in small strips, which I often add to Asian soups or it's good just to snack on. Not very filling, but good and it has essential Iodine in it. Healthy and you don't have to worry about tipping the scale! The strips come something like this.

Lay a sheet of Nori paper, dull side up, onto a flat surface. Gently, pick up a sushi roll and place it along the edge of the Nori paper. Now, firmly and evenly, begin to roll the sushi roll around the sheet of Nori Paper. When you reach the point where the ends of the Nori paper are just overlapping, run your fingers under some cold water to wet them and run your wet fingers along the Nori paper before overlapping it. The water will make the two surfaces of Nori paper stick together. Apply a bit of pressure with your fingers to make sure the two edges stick together well. The Nori paper isn't very wide, so you will need 2 sheets of it to complete a sushi roll. Just repeat the process above, remembering to wet surfaces of Nori paper where it joins together, so it sticks well.
I then put the completed rolls of sushi, with Nori paper covering, back into the refrigerator for about 20 minutes to allow the Nori paper to firmly attach to the rice. The moisture in the rice will be drawn into the Nori paper to help that process.
Remove the sushi rolls from the refrigerator, again on a good flat surface and here...your very sharp knife comes in handy!!! Wet the sharp knife blade with cold water, then holding the sushi roll with your other hand, cut a thin slice of sushi. The sharpness of the knife is important here, as you don't want to have to do a "sawing" motion with the knife, or you will tear your sushi apart. I cut the slices about 1/2 inch thick. Between each cut, wash the knife blade to remove any rice residue, so you will get a nice clean cut!
If I'm not real clear on the instructions for using the Bazooka Press, there is an excellent YouTube video which will help. Here you go for the video! Using the Bazooka Press
You're now ready to serve your sushi!!! Decorate it any way you wish! I usually sprinkle some sesame seed on the slices. For color, I use a mix of black and white sesame seed. It comes bottled something like this. And, it's not necessary...it's optional!

If you're still awake after reading all of this...let me say it takes way longer to write out the instructions and explain the tools used than it does to make several batches of sushi! Please don't be put off by the long, detailed instructions. It's not difficult to make good sushi!!! You may have to practice a bit to get the pressure thing down right while working with the rice and rolls, but you will get it quickly!
Again, you may find it much easier to use the regular Japanese wooden sushi press to make your sushi. But this method works well for me and is easy to do!
If you have questions, I'll be happy to help. Feel free to email me at: stan.kain@gmail.com
No comments:
Post a Comment