It's a cool Autumn morning here in Oklahoma...and that signals one of my favorite activities. Something nutritious and warm going in the crock pot all day. It's lunch....it's dinner....and it's a welcome greeting for anyone who happens to drop by the house and need a warm up! Often, it will be chili beans or some home made soup. This morning, I've decided on a big pot of Minestrone soup for the day.
I like a hearty soup, full of delicious vegetables and good stock. So, the list of ingredients is long, but everything is inexpensive and easy to obtain. You can be assured, no one will go away hungry nor not satisfied with something about this soup! Let's get out the big crock pot and get started!
INGREDIENTS
3 Russet Potatoes (Medium Sized, peeled and cubed)
1 White Onion (Medium Sized, cubed)
1 Cup Roma Tomatoes (Diced)
2 Zucchini Squash (Cubed)
1 Cup Carrots (Sliced)
1 Cup Okra (Sliced)
1 Cup Kidney Beans
1 Cup Cannellini Beans
1/2 Cup Chopped Baby Spinach *
1/2 Cup Barley *
3/4 Cup Ditalini Pasta *
2 Cups Tomato Juice
2 Cups Vegetable Broth
1 Tablespoon Dry Oregano
1 Tablespoon Dry Basil
1 Teaspoon Garlic Powder
Salt to taste
Pepper to taste
* Spinach, Barley and Pasta are added to the soup about 1 hour before it's ready to eat.
PREPARATION
I like to start my crock pot soup early in the morning. I put all the ingredients, except the Spinach, Barley and Pasta into the crock pot, early in the morning and set the crock pot on the "High" temperature setting. After 2 hours, I reduce the crock pot temperature setting to "Low" and let the soup simmer for at least 4 hours. If you're going to be away at work, I'd just set it on "Low" and let it cook all day while you're away. The slow simmering blends all the flavors and makes for a great tasting soup.
This makes a huge pot of soup, but that's okay! You can put the leftovers in freezer containers or zip lock freezer bags and freeze it. On future chilly days, warm up a container of soup for a warming lunch meal!
If you have questions, please feel free to email me at: stan.kain@gmail.com Also, you are welcome to subscribe to my recipe blog and you won't miss future additions, since I add recipes quite often!
Thursday, October 13, 2016

Wednesday, October 12, 2016
Home Made Hosin Sauce
Hosin sauce is commonly used in the preparation of many Chinese foods. The barbecued pork recipe I posted calls for Hosin Sauce for one of the ingredients. You may purchase Hosin Sauce in one of many brands, even at most grocery stores. But, if you prefer, you may make your own Hosin Sauce at home and keep it on hand. It's easy to make. Here's how!
INGREDIENTS
To make 1 cup of finished Hosin Sauce
3/4 cup Soy Sauce
6 Tablespoons Peanut Butter or Black Bean Paste
3 Tablespoons Honey or Molasses
6 Teaspoons Rice Vinegar
3 Cloves minced Garlic
6 Teaspoons Sesame Oil
3 Teaspoons Chinese Hot Sauce (available at most grocery stores in the Asian food section)
1/2 Teaspoon Black Pepper
Thoroughly mix all the ingredients together and store in an empty bottle. Does not require refrigeration. This way, you'll have Hosin Sauce available for recipes calling for it. Easy to make!
If you have questions, please feel free to email me at: stan.kain@gmail.com Also, consider subscribing to my recipe blog, so you'll be notified as I add new recipes to the growing list! Enjoy!!!
INGREDIENTS
To make 1 cup of finished Hosin Sauce
3/4 cup Soy Sauce
6 Tablespoons Peanut Butter or Black Bean Paste
3 Tablespoons Honey or Molasses
6 Teaspoons Rice Vinegar
3 Cloves minced Garlic
6 Teaspoons Sesame Oil
3 Teaspoons Chinese Hot Sauce (available at most grocery stores in the Asian food section)
1/2 Teaspoon Black Pepper
Thoroughly mix all the ingredients together and store in an empty bottle. Does not require refrigeration. This way, you'll have Hosin Sauce available for recipes calling for it. Easy to make!
If you have questions, please feel free to email me at: stan.kain@gmail.com Also, consider subscribing to my recipe blog, so you'll be notified as I add new recipes to the growing list! Enjoy!!!
Chinese Barbecued Pork
When it comes to meat, this is one of my favorites! And, it's one of the Asian dishes I fix around here that's wildly popular and a frequent request. Anyone who eats at a Chinese restaurant is familiar with it and probably eats quite a bit of it. Chinese Barbecued Pork....in Chinese restaurants....and around here, often served as small pieces on skewers. Fondly referred to when done in this manner, around this house...and I've heard the term in Chinese restaurants, as well, as "Rat on a stick," or "Cat on a stick!" LOL Whatever! It's popular! And I will often prepare lean "Farmer Style" boneless pork ribs in the same manner...less the stick. I'm sure you'll enjoy this one!
INGREDIENTS
3 Pounds Pork Loin or Lean Farmer Style boneless pork ribs (Lean Pork)
1/4 Cup of Honey
1/4 Cup of Ketchup
1/4 Cup of Hoisin Sauce (I'll explain this)
2 Teaspoons of Grated Fresh Ginger Root (You may substitute with Ginger powder if necessary)
3 Teaspoons Minced Garlic (You may substitute with Garlic powder if necessary)
3 Teaspoons Soy Sauce
1 Teaspoon Red Food Coloring (optional, but really adds to the finished appearance)
Bamboo Skewers (If you're going to prepare it on a stick)
NOTE: Hoisin Sauce is a common Chinese sauce and readily available in one of many brands at local grocery stores. Generally, I just buy it, however you can make it and keep it on hand, as well. I'll share a recipe here in the blog for making Hoisin Sauce. It's also easy to do!
Here is an example of commercial Hoisin Sauce:

This pork dish is one you want to prepare a day ahead of time, as we're going to marinate the pork, leaving it in the refrigerator overnight. So, prepare well ahead of time!
MARINADE
Using a bowl, add the soy sauce, minced garlic, grated Ginger Root, Hoisin Sauce, Ketchup, Honey and Red Food Coloring. Stir and mix well! I usually pour it from the bowl into a large zip lock plastic bag, as it's easy to find space in the refrigerator and the meat will rest completely in the marinade.
PREPARE MEAT
If you're going to serve the pork on skewers, cut the pork loin into strips about 3/4 inch thick and 1 1/2 inches long. Trim excess fat. If you plan to use the Farmer Style boneless ribs, just remove any excess fat. Use a fork to "stab" the meat all over, which helps tenderize it and allows the marinade to penetrate better. If I'm going to use the big Farmer Style ribs, I will even use a syringe and needle, made for food marinating and inject some of the marinade into the pieces of meat. Now, add the meat to the zip lock bag of marinade and put it in the refrigerator overnight to marinate. Leaving it longer won't hurt anything!
HELPFUL TIP: If you are going to cook the pork on bamboo skewers, soak the skewers in water for about half an hour before using. They will absorb enough moisture that they won't burn while on the grill.
Now, it's time to fire up the barbecue. Get a nice bed of hot coals going to slowly cook your pork. "Thread" the small pieces of pork onto the skewers and place them on the grill. As an alternative, if using the pork ribs, place them on the grill. You want them to cook slowly and completely, but don't overcook them! Check them often and turn the meat or skewers as they cook. This is pork, so use a meat thermometer to make sure you have an inside temperature of 160 degrees when the pork is done. I prefer to save the marinade I used for the meat and brush some onto the meat while cooking.
As an alternative to the grill, you may also broil the meat in the oven. I bake and broil around a lot around here, avoiding fried foods as much as possible. Just remember, it cooks much faster and requires checking and turning more often. Likewise, brush the meat with the marinade as it cooks. A bit of charring on the outside of the meat adds to the appearance, along with the deep red color from the food dye and it will look like the pork you enjoy at the Chinese restaurant. Steamed rice is a nice side dish to serve with your barbecued pork.
I hope you enjoy this dish as much as we all enjoy it around my house. It really is delicious!!!
If you have any questions, please feel free to email me at: stan.kain@gmail.com Consider subscribing to my recipe blog here, so you get the latest updates when I add new recipes!
INGREDIENTS
3 Pounds Pork Loin or Lean Farmer Style boneless pork ribs (Lean Pork)
1/4 Cup of Honey
1/4 Cup of Ketchup
1/4 Cup of Hoisin Sauce (I'll explain this)
2 Teaspoons of Grated Fresh Ginger Root (You may substitute with Ginger powder if necessary)
3 Teaspoons Minced Garlic (You may substitute with Garlic powder if necessary)
3 Teaspoons Soy Sauce
1 Teaspoon Red Food Coloring (optional, but really adds to the finished appearance)
Bamboo Skewers (If you're going to prepare it on a stick)
NOTE: Hoisin Sauce is a common Chinese sauce and readily available in one of many brands at local grocery stores. Generally, I just buy it, however you can make it and keep it on hand, as well. I'll share a recipe here in the blog for making Hoisin Sauce. It's also easy to do!
Here is an example of commercial Hoisin Sauce:

This pork dish is one you want to prepare a day ahead of time, as we're going to marinate the pork, leaving it in the refrigerator overnight. So, prepare well ahead of time!
MARINADE
Using a bowl, add the soy sauce, minced garlic, grated Ginger Root, Hoisin Sauce, Ketchup, Honey and Red Food Coloring. Stir and mix well! I usually pour it from the bowl into a large zip lock plastic bag, as it's easy to find space in the refrigerator and the meat will rest completely in the marinade.
PREPARE MEAT
If you're going to serve the pork on skewers, cut the pork loin into strips about 3/4 inch thick and 1 1/2 inches long. Trim excess fat. If you plan to use the Farmer Style boneless ribs, just remove any excess fat. Use a fork to "stab" the meat all over, which helps tenderize it and allows the marinade to penetrate better. If I'm going to use the big Farmer Style ribs, I will even use a syringe and needle, made for food marinating and inject some of the marinade into the pieces of meat. Now, add the meat to the zip lock bag of marinade and put it in the refrigerator overnight to marinate. Leaving it longer won't hurt anything!
HELPFUL TIP: If you are going to cook the pork on bamboo skewers, soak the skewers in water for about half an hour before using. They will absorb enough moisture that they won't burn while on the grill.
Now, it's time to fire up the barbecue. Get a nice bed of hot coals going to slowly cook your pork. "Thread" the small pieces of pork onto the skewers and place them on the grill. As an alternative, if using the pork ribs, place them on the grill. You want them to cook slowly and completely, but don't overcook them! Check them often and turn the meat or skewers as they cook. This is pork, so use a meat thermometer to make sure you have an inside temperature of 160 degrees when the pork is done. I prefer to save the marinade I used for the meat and brush some onto the meat while cooking.
As an alternative to the grill, you may also broil the meat in the oven. I bake and broil around a lot around here, avoiding fried foods as much as possible. Just remember, it cooks much faster and requires checking and turning more often. Likewise, brush the meat with the marinade as it cooks. A bit of charring on the outside of the meat adds to the appearance, along with the deep red color from the food dye and it will look like the pork you enjoy at the Chinese restaurant. Steamed rice is a nice side dish to serve with your barbecued pork.
I hope you enjoy this dish as much as we all enjoy it around my house. It really is delicious!!!
If you have any questions, please feel free to email me at: stan.kain@gmail.com Consider subscribing to my recipe blog here, so you get the latest updates when I add new recipes!
Tuesday, October 11, 2016
Chinese Egg Drop Soup
On cold days, or days when I'm not feeling very well, one of my favorite "comfort soups" is Chinese Egg Drop Soup. Probably the Chinese equivalent to Chicken Noodle Soup....I don't know. But, it's a favorite, even if I'm out at a Chinese restaurant....something I always have to include with my meal.
Egg Drop Soup is very simple to prepare at home and I can put a pot of it together, even if I'm feeling under the weather. It warms you right up and it's easy on the digestive system, if you aren't feeling well or have a bit of a cold or the flu. It's also nice to serve as a side treat with any Asian meal you serve.
Here's a simple recipe and it will be every bit as good as what you find in a Chinese restaurant! Since I do a lot of Asian cooking around here, my kitchen is always stocked with boxes of chicken, beef and vegetable broth. Never without it! I use it in many soups and other Asian dishes, as well as a few other styles of cooking.
INGREDIENTS
5 Cups Chicken Broth (packaged or homemade)
2 Eggs
2 Tablespoons Soy Sauce
2 Tablespoons Corn Starch
1 Tablespoon Oyster Sauce
1 Teaspoon Sesame Oil
2 Scallions (Green Onions)


Put 4 3/4 cups of chicken broth in a pot and bring to a boil on medium heat. While you're waiting for the chicken broth to boil, put the remaining 1/4 cup of cold chicken broth into a container and stir in the corn starch, making sure it's well mixed. Crack the 2 eggs into a measuring cup and beat them thoroughly. Finely chop the 2 scallions, including the green tops.
As the chicken broth comes to a boil, add the Sesame oil, Oyster Sauce and Soy Sauce. Stir in well. With the broth at a gentle boil, add the cornstarch and remaining chicken broth, stirring in well. The broth will begin to thicken a bit from the corn starch and as soon as it does, reduce the heat to a simmer.
Now, SLOWLY DRIZZLE the beaten eggs into the simmering broth, while whisking the egg into the broth. I prefer using a pair of chopsticks for doing this, but if you wish, you may use a fork. Whisk well, so you get fine strands of egg and not a lump.
Once the eggs are in the soup, add the scallions and stir, right before removing the soup from the heat. You really don't want the tender scallions to cook in the soup, but they will soften and impart flavor just being in the hot soup. Once the scallions are stirred in, the Egg Drop soup is ready to serve! Enjoy!
If you have questions, please email me at: stan.kain@gmail.com
Egg Drop Soup is very simple to prepare at home and I can put a pot of it together, even if I'm feeling under the weather. It warms you right up and it's easy on the digestive system, if you aren't feeling well or have a bit of a cold or the flu. It's also nice to serve as a side treat with any Asian meal you serve.
Here's a simple recipe and it will be every bit as good as what you find in a Chinese restaurant! Since I do a lot of Asian cooking around here, my kitchen is always stocked with boxes of chicken, beef and vegetable broth. Never without it! I use it in many soups and other Asian dishes, as well as a few other styles of cooking.
INGREDIENTS
5 Cups Chicken Broth (packaged or homemade)
2 Eggs
2 Tablespoons Soy Sauce
2 Tablespoons Corn Starch
1 Tablespoon Oyster Sauce
1 Teaspoon Sesame Oil
2 Scallions (Green Onions)

This is an example of the Oyster Sauce I use here.

And this would be the Sesame Oil I use.
Put 4 3/4 cups of chicken broth in a pot and bring to a boil on medium heat. While you're waiting for the chicken broth to boil, put the remaining 1/4 cup of cold chicken broth into a container and stir in the corn starch, making sure it's well mixed. Crack the 2 eggs into a measuring cup and beat them thoroughly. Finely chop the 2 scallions, including the green tops.
As the chicken broth comes to a boil, add the Sesame oil, Oyster Sauce and Soy Sauce. Stir in well. With the broth at a gentle boil, add the cornstarch and remaining chicken broth, stirring in well. The broth will begin to thicken a bit from the corn starch and as soon as it does, reduce the heat to a simmer.
Now, SLOWLY DRIZZLE the beaten eggs into the simmering broth, while whisking the egg into the broth. I prefer using a pair of chopsticks for doing this, but if you wish, you may use a fork. Whisk well, so you get fine strands of egg and not a lump.
Once the eggs are in the soup, add the scallions and stir, right before removing the soup from the heat. You really don't want the tender scallions to cook in the soup, but they will soften and impart flavor just being in the hot soup. Once the scallions are stirred in, the Egg Drop soup is ready to serve! Enjoy!
If you have questions, please email me at: stan.kain@gmail.com
Potato Salad (Mom's Recipe)
Potato salad is pretty generic, as a rule and I think most everyone has some sort of recipe they follow for making it. I've had potato salad at restaurants and take out, but never been really happy with how it tasted. I don't know....maybe it's nostalgia, but there's never been potato salad for me that tasted better than the recipe my mother always used. It's the recipe I've known and loved for well better than 65 years, so I just stay with it. It must be pretty good, as when I make it, everyone seems to show up to get some to take home with them. There's certainly nothing fancy nor exotic about it, but it just satisfies. You'll note that my recipe makes a HUGE batch and feel free to adjust it as necessary. I just know if I make this much of it, it always disappears from the refrigerator!
INGREDIENTS
10 pounds Russet potatoes
12 Eggs
1 Green Bell Pepper
1 Medium Purple onion
8 Ounces Sweet Pickles
Salt (to taste)
Pepper (to taste)
Paprika (to taste)
Mayonnaise
Yellow Mustard
PREPARATION
Begin by peeling the Russet potatoes and cutting them into quarters to facilitate boiling. Boil the potatoes, but don't over do it unless you want mashed potato salad. Check them with a fork as they boil, allowing for a bit of firmness so you have somewhat "chunky" potato salad after it's prepared. If you prefer smoother potato salad, feel free to boil them a bit more.
Hard boil the 12 eggs, remove the shells and allow them to cool a bit in cold water for easy handling.
Now, for some dicing. Remove the seeds from the green bell pepper and dice the pepper. Cut the purple onion up and dice it, as well. Dice the sweet pickles....I like a lot of sweet pickle in my potato salad, so I use all 8 ounces. Save the juice from the sweet pickles...we're going to use it. No, I don't use sweet pickle relish in place of the diced sweet pickles, as it just doesn't work as well to me. Dice the dozen hard boiled eggs, as well.
In a large pot, add the potatoes, bell pepper, onion, sweet pickles and hard boiled eggs. Mix the ingredients all together. As you are mixing them, add salt and pepper to your taste.
Now, add about 4 ounces of the sweet pickle juice to the pot and mix it in well with the salad. I like the taste of the sweet pickles and juice, so I add enough to satisfy my own taste for that.
Now, begin adding the Mayonnaise to the salad. Make sure you really moisten the salad with the Mayonnaise. Don't worry too much about putting in too much mayo, as the potatoes are going to absorb it quickly. Begin adding the mustard to the salad...usually I use about half as much mustard as I did Mayonnaise, as I like a nice yellowish color to the salad and the flavor of the mustard should come through the flavor. Your salad should have a nice sunny, yellowish color by the time you finish adding the mustard.
Add the Paprika to the salad, sprinkling it generously into the mix. Stir in well and there should be a nice reddish hint of color to the yellow potato salad mix. When I'm finished mixing all together, I sprinkle a bit of Paprika on top of the salad, just for appearance.
I find that the flavors blend best if you allow the salad to rest in the refrigerator for several hours, or even better...overnight...before serving. Check the salad before serving, as the Mayonnaise will absorb into the potatoes, leaving the salad a bit too dry. I then add more Mayonnaise to moisten the salad before serving.
The salad is ready to serve...with a bright sunny color, just a hint of blush from the Paprika and some inviting color from the green bell pepper, purple onion and green sweet pickles. The sweetness of the pickle juice and the sour taste of the mustard really imparts a pleasant flavor to the potato salad.
I hope you enjoy and get as many compliments for your salad as I do mine. Everyone seems to love it!
If you have any questions, please feel free to email me at: stan.kain@gmail.com
INGREDIENTS
10 pounds Russet potatoes
12 Eggs
1 Green Bell Pepper
1 Medium Purple onion
8 Ounces Sweet Pickles
Salt (to taste)
Pepper (to taste)
Paprika (to taste)
Mayonnaise
Yellow Mustard
PREPARATION
Begin by peeling the Russet potatoes and cutting them into quarters to facilitate boiling. Boil the potatoes, but don't over do it unless you want mashed potato salad. Check them with a fork as they boil, allowing for a bit of firmness so you have somewhat "chunky" potato salad after it's prepared. If you prefer smoother potato salad, feel free to boil them a bit more.
Hard boil the 12 eggs, remove the shells and allow them to cool a bit in cold water for easy handling.
Now, for some dicing. Remove the seeds from the green bell pepper and dice the pepper. Cut the purple onion up and dice it, as well. Dice the sweet pickles....I like a lot of sweet pickle in my potato salad, so I use all 8 ounces. Save the juice from the sweet pickles...we're going to use it. No, I don't use sweet pickle relish in place of the diced sweet pickles, as it just doesn't work as well to me. Dice the dozen hard boiled eggs, as well.
In a large pot, add the potatoes, bell pepper, onion, sweet pickles and hard boiled eggs. Mix the ingredients all together. As you are mixing them, add salt and pepper to your taste.
Now, add about 4 ounces of the sweet pickle juice to the pot and mix it in well with the salad. I like the taste of the sweet pickles and juice, so I add enough to satisfy my own taste for that.
Now, begin adding the Mayonnaise to the salad. Make sure you really moisten the salad with the Mayonnaise. Don't worry too much about putting in too much mayo, as the potatoes are going to absorb it quickly. Begin adding the mustard to the salad...usually I use about half as much mustard as I did Mayonnaise, as I like a nice yellowish color to the salad and the flavor of the mustard should come through the flavor. Your salad should have a nice sunny, yellowish color by the time you finish adding the mustard.
Add the Paprika to the salad, sprinkling it generously into the mix. Stir in well and there should be a nice reddish hint of color to the yellow potato salad mix. When I'm finished mixing all together, I sprinkle a bit of Paprika on top of the salad, just for appearance.
I find that the flavors blend best if you allow the salad to rest in the refrigerator for several hours, or even better...overnight...before serving. Check the salad before serving, as the Mayonnaise will absorb into the potatoes, leaving the salad a bit too dry. I then add more Mayonnaise to moisten the salad before serving.
The salad is ready to serve...with a bright sunny color, just a hint of blush from the Paprika and some inviting color from the green bell pepper, purple onion and green sweet pickles. The sweetness of the pickle juice and the sour taste of the mustard really imparts a pleasant flavor to the potato salad.
I hope you enjoy and get as many compliments for your salad as I do mine. Everyone seems to love it!
If you have any questions, please feel free to email me at: stan.kain@gmail.com
Monday, October 10, 2016
Mini-Omelet In A Cup
Here's a nutritious breakfast that's easy to make and easy to eat, even if you're trying to eat while doing other things...like commuting! Fresh ingredients add flavor and it's better than "drive through" food.
INGREDIENTS
Eggs
Green Bell Pepper
White Onion
Roma Tomato
Fresh or Frozen Baby Spinach
Salt
Pepper
PREPARATION
Pre-heat oven to 350F degrees
Dice Green Bell Pepper
Dice White Onion
Dice Roma Tomato (I use Roma tomatoes in most everything. They are firm, yet flavorful)
Chop fresh spinach, or use frozen chopped spinach
Beat eggs in a bowl, as you would for scrambled eggs - salt and pepper to taste
Using a metal muffin tin, insert paper muffin cups in each hole
In each muffin cup, put a bit of spinach, onion, tomato and bell pepper. Pour the beaten egg mix into the cups to fill them up.
Put the muffin tin in the pre-heated oven and cook for about 15 minutes or until the eggs are finished cooking. Checking the egg with a toothpick will let you know if the eggs are cooked in the middle.
Remove the paper muffin cups from the pan and you have a mini-omelet ready to eat on the run! Fresh ingredients without the preservatives!
INGREDIENTS
Eggs
Green Bell Pepper
White Onion
Roma Tomato
Fresh or Frozen Baby Spinach
Salt
Pepper
PREPARATION
Pre-heat oven to 350F degrees
Dice Green Bell Pepper
Dice White Onion
Dice Roma Tomato (I use Roma tomatoes in most everything. They are firm, yet flavorful)
Chop fresh spinach, or use frozen chopped spinach
Beat eggs in a bowl, as you would for scrambled eggs - salt and pepper to taste
Using a metal muffin tin, insert paper muffin cups in each hole
In each muffin cup, put a bit of spinach, onion, tomato and bell pepper. Pour the beaten egg mix into the cups to fill them up.
Put the muffin tin in the pre-heated oven and cook for about 15 minutes or until the eggs are finished cooking. Checking the egg with a toothpick will let you know if the eggs are cooked in the middle.
Remove the paper muffin cups from the pan and you have a mini-omelet ready to eat on the run! Fresh ingredients without the preservatives!
Let's Make Sushi!
I prepare Sushi quite often and get a lot of requests for how to do it. I grew up eating it and truly enjoy many varieties. Sushi is quite expensive if you go to a Sushi restaurant and it's really not difficult to prepare at home. Likewise, you have the opportunity to be artistic and creative, depending on your skills. Let me begin, for the sake of purists and say it's not all called, "Sushi." Each style has it's own name for the Japanese, but for the sake of simplicity here, I'm just going to refer to it all as "sushi."
Before you say, "I don't eat raw fish!," I'm going to share a recipe for a "California Roll," with no raw fish used. I live in Oklahoma and you don't dare say, "raw fish" to these people...unless maybe it would be catfish! I'll also explain about using raw fish and at this point, I want to give you an important warning!!!
IF YOU ARE GOING TO USE RAW FISH, BE SURE YOU CAN GET VERY FRESH, NEVER FROZEN, RAW TUNA OR SALMON...AS I THINK THOSE ARE BEST. DO NOT CROSS CONTAMINATE YOUR RAW FISH WITH ANYTHING ELSE AND MAKE SURE YOUR FISH IS KEPT COLD AT ALL TIMES! EVEN IF YOU HOLD IT ON CRUSHED ICE WHILE WORKING WITH IT. THE LAST THING YOU WANT TO DO IS GIVE FOOD POISONING TO YOUR GUESTS!
There are basically three different ways in which to prepare your sushi. You may prepare it with a sushi press, you may roll the sushi, or you may use something we call a "bazooka." Whichever method you use, it's very important that the rice and ingredients are very firmly packed when you finish, so your treat doesn't just fall apart in your hand. I think using the bamboo mat to roll sushi is probably the most difficult way, as it requires even pressure and some real dexterity. I have a neurological disorder which affects my hands, so for me, it's an impossibility today. Eating with chopsticks is out for the same reason, although I still use them a bit in food preparation.
As you can tell by my long explanations here, this is going to be far more than just a "recipe." This is going to be instructional, as well, since there's no way I can merely give you a recipe and expect you to come up with a satisfactory finished item! So, please bear with me while I walk you through the steps to the finished item!
Before we begin making sushi, the first thing we need to do is have some basic tools available. What you choose to use depends on whether you are going to roll or press the sushi. All of the tools are very simple, most are made of wood and are readily available, no matter where you live. Thank you, Amazon.com! All of the tools are quite inexpensive, as well. Disclaimer! I have absolutely NO connection to Amazon, Wal-Mart nor any other company. I find many items I use either at Wal-Mart, through Wal-Mart.com or from Amazon.com, where it seems one can find anything! I live in a small, rural area of Oklahoma, so much of what I get comes by mail from Amazon. If you live in a large urban area, you may be able to find the items locally. Just do whatever works best for you!
TOOLS
Rolled Sushi - If you plan to roll your sushi, you will need a bamboo mat. The mat is very similar to what you would think of as a bamboo place mat at the table. Here is an example of a Sushi Mat.



It's usual to have little dishes of condiments to serve with your sushi. I always offer a small dish of soy sauce for dipping and a small dish of Wasabi sauce. (Wasabi sauce is HOT!!! VERY HOT! And it's available just about anywhere...including Wal-Mart). Likewise, I use fresh Ginger Root in many of my Asian dishes, so I always have a piece of fresh Ginger Root in the refrigerator. I cut a piece of it, peel it and either slice it paper thin or grate it and offer a small dish of it as a condiment, as well.
If you're still awake after reading all of this...let me say it takes way longer to write out the instructions and explain the tools used than it does to make several batches of sushi! Please don't be put off by the long, detailed instructions. It's not difficult to make good sushi!!! You may have to practice a bit to get the pressure thing down right while working with the rice and rolls, but you will get it quickly!
Again, you may find it much easier to use the regular Japanese wooden sushi press to make your sushi. But this method works well for me and is easy to do!
If you have questions, I'll be happy to help. Feel free to email me at: stan.kain@gmail.com
Before you say, "I don't eat raw fish!," I'm going to share a recipe for a "California Roll," with no raw fish used. I live in Oklahoma and you don't dare say, "raw fish" to these people...unless maybe it would be catfish! I'll also explain about using raw fish and at this point, I want to give you an important warning!!!
IF YOU ARE GOING TO USE RAW FISH, BE SURE YOU CAN GET VERY FRESH, NEVER FROZEN, RAW TUNA OR SALMON...AS I THINK THOSE ARE BEST. DO NOT CROSS CONTAMINATE YOUR RAW FISH WITH ANYTHING ELSE AND MAKE SURE YOUR FISH IS KEPT COLD AT ALL TIMES! EVEN IF YOU HOLD IT ON CRUSHED ICE WHILE WORKING WITH IT. THE LAST THING YOU WANT TO DO IS GIVE FOOD POISONING TO YOUR GUESTS!
There are basically three different ways in which to prepare your sushi. You may prepare it with a sushi press, you may roll the sushi, or you may use something we call a "bazooka." Whichever method you use, it's very important that the rice and ingredients are very firmly packed when you finish, so your treat doesn't just fall apart in your hand. I think using the bamboo mat to roll sushi is probably the most difficult way, as it requires even pressure and some real dexterity. I have a neurological disorder which affects my hands, so for me, it's an impossibility today. Eating with chopsticks is out for the same reason, although I still use them a bit in food preparation.
As you can tell by my long explanations here, this is going to be far more than just a "recipe." This is going to be instructional, as well, since there's no way I can merely give you a recipe and expect you to come up with a satisfactory finished item! So, please bear with me while I walk you through the steps to the finished item!
Before we begin making sushi, the first thing we need to do is have some basic tools available. What you choose to use depends on whether you are going to roll or press the sushi. All of the tools are very simple, most are made of wood and are readily available, no matter where you live. Thank you, Amazon.com! All of the tools are quite inexpensive, as well. Disclaimer! I have absolutely NO connection to Amazon, Wal-Mart nor any other company. I find many items I use either at Wal-Mart, through Wal-Mart.com or from Amazon.com, where it seems one can find anything! I live in a small, rural area of Oklahoma, so much of what I get comes by mail from Amazon. If you live in a large urban area, you may be able to find the items locally. Just do whatever works best for you!
TOOLS
Rolled Sushi - If you plan to roll your sushi, you will need a bamboo mat. The mat is very similar to what you would think of as a bamboo place mat at the table. Here is an example of a Sushi Mat.

Here is an example of what you will have with rolled sushi. This is the same, if you're using a "bazooka press."

Basically, the mat is placed on a flat surface, covered with a sheet of plastic wrap. The Nori sheet (seaweed paper), if you are going to use Nori paper...is placed on top of the plastic wrap, then the rice is spread onto the surface of the Nori paper. Thinly sliced ingredients are placed on top of the rice and you begin to "roll," using firm, even pressure until you create a round roll, as shown above. Trust me, this is going to take some practice to get right!!! If you don't apply enough pressure, the sushi roll will merely fall apart. If you don't apply even pressure, it's not going to come out as a round roll. All additional instructions here will apply, no matter which method you use for making your sushi.
Pressed Sushi - Another method you may consider is to use a Sushi Press. Again, very simple to do and the press is really just a small wooden box. You may line the box with Nori paper...or not. Your choice. Again, begin by pressing some rice into the box, then you may "layer" your other ingredients, either all together or with rice between each layer. Often, a very thin slice of fresh salmon or tuna may be placed on top of the roll. When you have all your ingredients in place, you use the wooden top, supplied with the press, to apply pressure to the roll of sushi, compacting it all so you can cut the sections. The better sushi presses have slits cut in the sides, so you can cut your pieces of sushi evenly. We'll talk more about cutting, shortly. Here is an example of a sushi press.

And here are some examples of the finished product, if you're using a sushi press.
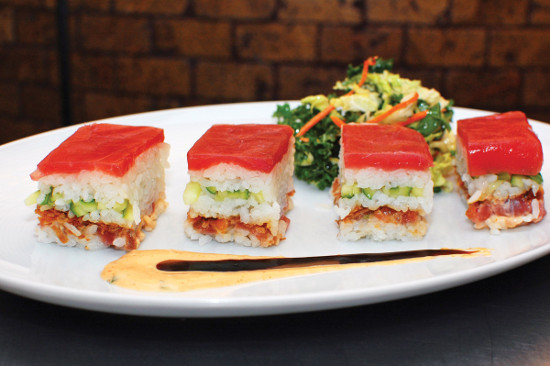


Rolled Sushi Bazooka Press - You may opt for making rolled sushi using a "Bazooka Press." This is very easy to do and if you want rolled sushi, it's probably the easiest way to go. I use a bazooka press around here much of the time. I'll be showing how to use a bazooka press in my recipe here.

Incidentally, none of the above pieces of equipment cost more than $15.00 to obtain through Amazon.com
You are also going to need a rice paddle. You need a rice paddle, no matter what you're doing with sticky rice. I use one for serving rice, as well. You will use the rice paddle for spreading or packing the rice with each method of making sushi. Likewise, the rice paddle works best when blending the sushi vinegar into the sticky rice for sushi. It's an essential tool!!! Most rice paddles, as with most other Japanese kitchen implements, is made of wood. You'll also find them made of plastic. I have both around the kitchen. They are short....about 6 to 8 inches in length. Here is a plastic rice paddle from my kitchen.

Last but not least, you will need a VERY SHARP kitchen knife with a thin blade! Sharp is the key word here! You want a quality blade which you can easily sharpen with a knife sharpener and which will hold a good edge. As I get into more Asian food recipes, the sharp kitchen knife is used for most everything! Preparing meat and vegetables for Asian dishes requires a super sharp knife, as you will be slicing the ingredients almost paper thin. I'm a "kitchen tyrant" when it comes to my special kitchen knives. NO ONE touches them! They aren't utility knives!!! They are specifically for one purpose...preparing Asian foods!
Okay...I think we have it all together now! You have the basic tools for sushi making and for preparing a lot more Asian food dishes. Let's begin making my California Roll sushi!
INGREDIENTS
2 Cups of cooked sticky rice (refer to my recipe in this blog for making sticky rice)
80 ml Sushi Vinegar (refer to my recipe in this blog for making Sushi Vinegar) Sushi Vinegar is optional but traditional.
1 Avocado
3 Sweet Baby Carrots
1 Japanese or English Cucumber (preferred but you may use any cucumber)
1 small package of Artificial Crab or Lobster (Available at most any grocery store...it's made from Pollack fish and is precooked and ready to use for salads and other dishes)
1 ounce Olive Oil
Sesame Seed (optional)
NOTE: Feel free to experiment with different ingredients. I use the above items for a reason. A slice of sushi should be put in the mouth in one bite. This gives the diner the opportunity to taste all the subtle flavors coming together on the palate and tongue. The cucumber helps with the moistness of the sushi and departs a mild but pleasant flavor. The carrot adds a bit of sweetness to the bite of sushi. Likewise, with the avocado...a mild, but not overpowering taste that enhances the flavor experience. The artificial crab is extremely mild in taste, so you don't want anything to overwhelm that flavor. With the above combination, each flavor seems to enhance and compliment the others.
PREPARING INGREDIENTS
Let the sushi making begin!!!
We'll start with your 2 cups of cooked sticky rice in a bowl. Slowly drizzle your sushi vinegar into the sticky rice, while using a "slicing" motion with the rice paddle to blend it in. You want to cool the rice at the same time, so it's fine to place a small fan near the bowl of rice to aid in the cooling. Otherwise, allow the rice time to cool after blending the sushi vinegar. You don't want to start with very hot sticky rice.
Peel the cucumber, carrots (if not already peeled when you get them) and remove the peel from the avocado. Using your sharp knife, cut the strips of artificial crab, lengthwise, in half. Cut the avocado, carrots and cucumber in long strips, as well, about 3/8ths of an inch square. You don't want any of these ingredients to be too thick, or they will be difficult to chew in the finished sushi. Nice delicate cuts will work best.
For this sushi, let's use the "Bazooka Press." Handy Tip!! Lightly coat all the internal parts of the Bazooka Press with olive oil. Just wipe it on, using a paper towel. It will aid in the sushi rice not sticking to the parts and coming out of the press quite easily. And, it won't affect the taste.
Begin by using the rice paddle to fill the open Bazooka Press with sticky rice. Fill the press fully on both halves, gently packing the rice. When you close the press, any excess rice will be squeezed out. Now, as shown in the picture below, use the plastic rod which comes with the Bazooka Press to form a deep channel in both halves of the press. Press the rod very firmly into the rice, as you want a nice, deep channel for your ingredients!

Now, you may begin placing the strips of your sushi ingredients into the channel you made in the rice. Place strips of artificial crab, avocado, cucumber and carrot into the channel, making sure the entire channel is filled. Place one layer on top of the next.
Now, you will note that the rod for the Bazooka Press has a plate on the end of it and is threaded to match the threads in the plastic tube. Lay the rod into one side of the open tube, with the threads on the rod into the threads in the tube. The plate should be right at the top of your rice and ingredient mix. Close the two halves of the hinged tube....while holding the rod in place. This is going to take some serious pressure, compacting the rice. Once you have the tube closed completely, there are two plastic snaps to lock the halves together. Excess rice will squeeze out of the sides of the tube. That's fine. There is a cap with the Bazooka press and you will place it on the open end of the Bazooka press. Hold the cap on tightly, or stand the press on end, so the cap is sitting on a flat surface. Holding the press, use one hand to hold and turn the threaded rod. The rod will screw down, further compacting the rice and ingredients. Continue until the rod has passed through the threaded part of the tube. Now, you may remove the cap from the opposite end and cut off any excess rice and ingredients sticking out the end of the tube. Using a cutting board, or flat surface, with the open end of the press on that surface, begin to slowly and firmly press the rod through the press. As you do so, a nice, firm roll of sushi will be extruded from the open end. Clean the press, rub the surfaces with some olive oil and repeat the process to make a second roll of sushi. You should easily have enough rice to make two nice sushi rolls. Put the two rolls of sushi, still on the cutting board or flat surface, into the refrigerator to chill. I like to leave them in the refrigerator for 20 to 30 minutes. This will make the sushi rolls nice and firm and easy to work with.
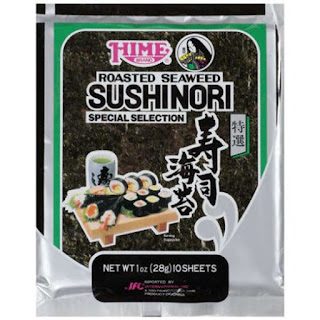
Removing the sushi rolls from the refrigerator, you're now ready for the Nori paper. I purchase the Nori paper in sheets, as it's easy to work with. If you need to cut it, you may do so with scissors. Just be gentle when working with it, so you don't tear it. It's quite thin. Here is the Nori paper I use. I find it at Wal-Mart in the Asian food section.

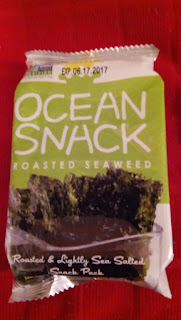
On a side note, you can also find Nori paper in small strips, which I often add to Asian soups or it's good just to snack on. Not very filling, but good and it has essential Iodine in it. Healthy and you don't have to worry about tipping the scale! The strips come something like this.

Lay a sheet of Nori paper, dull side up, onto a flat surface. Gently, pick up a sushi roll and place it along the edge of the Nori paper. Now, firmly and evenly, begin to roll the sushi roll around the sheet of Nori Paper. When you reach the point where the ends of the Nori paper are just overlapping, run your fingers under some cold water to wet them and run your wet fingers along the Nori paper before overlapping it. The water will make the two surfaces of Nori paper stick together. Apply a bit of pressure with your fingers to make sure the two edges stick together well. The Nori paper isn't very wide, so you will need 2 sheets of it to complete a sushi roll. Just repeat the process above, remembering to wet surfaces of Nori paper where it joins together, so it sticks well.
I then put the completed rolls of sushi, with Nori paper covering, back into the refrigerator for about 20 minutes to allow the Nori paper to firmly attach to the rice. The moisture in the rice will be drawn into the Nori paper to help that process.
Remove the sushi rolls from the refrigerator, again on a good flat surface and here...your very sharp knife comes in handy!!! Wet the sharp knife blade with cold water, then holding the sushi roll with your other hand, cut a thin slice of sushi. The sharpness of the knife is important here, as you don't want to have to do a "sawing" motion with the knife, or you will tear your sushi apart. I cut the slices about 1/2 inch thick. Between each cut, wash the knife blade to remove any rice residue, so you will get a nice clean cut!
If I'm not real clear on the instructions for using the Bazooka Press, there is an excellent YouTube video which will help. Here you go for the video! Using the Bazooka Press
You're now ready to serve your sushi!!! Decorate it any way you wish! I usually sprinkle some sesame seed on the slices. For color, I use a mix of black and white sesame seed. It comes bottled something like this. And, it's not necessary...it's optional!

If you're still awake after reading all of this...let me say it takes way longer to write out the instructions and explain the tools used than it does to make several batches of sushi! Please don't be put off by the long, detailed instructions. It's not difficult to make good sushi!!! You may have to practice a bit to get the pressure thing down right while working with the rice and rolls, but you will get it quickly!
Again, you may find it much easier to use the regular Japanese wooden sushi press to make your sushi. But this method works well for me and is easy to do!
If you have questions, I'll be happy to help. Feel free to email me at: stan.kain@gmail.com
Subscribe to:
Posts (Atom)