This marinade was originally intended for preparing baked salmon. The flavor is absolutely wonderful and I have found it would go well with many dishes, including chicken and other fish, as well. As such, I'm going to give you a recipe for the Teriyaki Marinade, separate from the Teriyaki Baked Salmon recipe, as I think if you try it, you're going to want to try using the marinade with many other dishes.
INGREDIENTS
3 Tablespoons Teriyaki Sauce
3 Tablespoons Hosin Sauce
3 Tablespoons Soy Sauce
1 Tablespoon White Vinegar
1 Tablespoon Sesame Oil
1/3 Cup Brown Sugar (Packed)
2 Cloves Fresh Garlic (Minced)
2 Teaspoons Fresh Ginger (Grated)
PREPARATION
Mix all ingredients together in a bowl until the sugar is completely dissolved and the marinade is a liquid.
If using to marinate fish, chicken or other meat, save the marinade after removing the meat to cook. Put the marinade in a saucepan and bring to a quick boil, then reduce heat to a simmer until the marinade has thickened.
Pour the marinade over the cooked meat or use it over other foods, as fit your taste. It's a delicious marinade with a unique flavor, yet doesn't overpower the taste of the main dish.
If you enjoy this recipe, please feel free to share it with family and friends. If you have any questions, feel free to email me at: stan.kain@gmail.com
Tuesday, August 8, 2017

Baked Teriyaki Salmon
Here is another excellent recipe for preparing salmon, if you prefer to bake instead of grill. Personally, I think the marinade is one of the best I've found. In fact, since the marinade is so good and will work with so many different types of dishes, I'm going to post a recipe for just the marinade here, as well.
INGREDIENTS
1 - 2 Pounds of salmon (Cut into strips 2 -3 inches wide)
MARINADE
3 Tablespoons Teriyaki Sauce
3 Tablespoons Hosin Sauce
3 Tablespoons Soy Sauce
1 Tablespoon White Vinegar
1 Tablespoon Sesame Oil
2 Cloves Minced Garlic
2 Teaspoons Grated Ginger
1/3 Cup Brown Sugar (Packed)
OPTIONAL
Sesame Seed
Chopped Green Scallions
PREPARATION
Put all marinade ingredients in a bowl and mix until sugar is all dissolved and the marinade is a liquid. Coat the salmon with the marinade and put in the refrigerator to marinate for about 20 minutes to a half an hour.
COOKING
Preheat oven to 400 F degrees. Remove salmon from the marinade and place in a baking dish. SAVE THE MARINADE!! Put salmon in the oven and cook for about 13 - 15 minutes, depending upon the thickness of the salmon. Salmon will be flaky when done.
While the salmon is baking, pour the marinade into a small saucepan. Bring pan to a quick boil, then back to simmer until the marinade thickens.
When the salmon is ready to serve, brush the marinade onto each piece. Sprinkle sesame seed onto each piece of salmon, over the marinade. Sprinkle some chopped green scallions on top and you're ready to serve! The marinade has a very unique, sweet flavor but isn't overwhelming with fish. I'm sure you will enjoy it!
If you enjoy this dish, please share the recipe with family and friends. If you have any questions, please feel free to email me at: stan.kain@gmail.com
INGREDIENTS
1 - 2 Pounds of salmon (Cut into strips 2 -3 inches wide)
MARINADE
3 Tablespoons Teriyaki Sauce
3 Tablespoons Hosin Sauce
3 Tablespoons Soy Sauce
1 Tablespoon White Vinegar
1 Tablespoon Sesame Oil
2 Cloves Minced Garlic
2 Teaspoons Grated Ginger
1/3 Cup Brown Sugar (Packed)
OPTIONAL
Sesame Seed
Chopped Green Scallions
PREPARATION
Put all marinade ingredients in a bowl and mix until sugar is all dissolved and the marinade is a liquid. Coat the salmon with the marinade and put in the refrigerator to marinate for about 20 minutes to a half an hour.
COOKING
Preheat oven to 400 F degrees. Remove salmon from the marinade and place in a baking dish. SAVE THE MARINADE!! Put salmon in the oven and cook for about 13 - 15 minutes, depending upon the thickness of the salmon. Salmon will be flaky when done.
While the salmon is baking, pour the marinade into a small saucepan. Bring pan to a quick boil, then back to simmer until the marinade thickens.
When the salmon is ready to serve, brush the marinade onto each piece. Sprinkle sesame seed onto each piece of salmon, over the marinade. Sprinkle some chopped green scallions on top and you're ready to serve! The marinade has a very unique, sweet flavor but isn't overwhelming with fish. I'm sure you will enjoy it!
If you enjoy this dish, please share the recipe with family and friends. If you have any questions, please feel free to email me at: stan.kain@gmail.com
Wednesday, June 21, 2017
Chinese Pancakes With Green Onions
I'm going to share a recipe for a rather unfamiliar Chinese breakfast dish you may enjoy. It's not something found on most Chinese buffets I've visited. It's quite easy to make, if you are good at making pie crust, anyway. I have to work at that!! Pastry is not my specialty! But, it's not difficult to do if you follow the directions! This is a light, tasty treat and worth giving a try!
INGREDIENTS
1/14 Cups All Purpose Flour
1/2 Cup (+) Water
1/2 Teaspoon Salt
1 Tablespoon Vegetable Oil
1 Scallion - Green Onion (Finely Chopped)
1/2 Teaspoon Chinese Five Spices Powder
PREPARATION
After chopping the green onion, prepare to make the dough. Put the four into a large mixing bowl and boil the water. Boil a little extra water, so you can have enough to get the consistency of the dough as it should be. When the water boils, add the salt and mix so the salt is fully dissolved.
Slowly add the boiled water to the flour, stirring as you do until the consistency is similar to pizza dough. Put the dough aside for about 10 minutes, allowing time for the mixture to cool off enough you can knead it. Knead the dough for about 5 minutes, then set aside for about 20 minutes, allowing it to rest.
Return to the dough, kneading it for another couple of minutes, then roll out into a flat circle, similar to a pie crust or thin pizza crust. With the dough rolled out, brush a little vegetable oil on the surface, then sprinkle the chopped green onions all over the surface of the crust. Follow by sprinkling the Five Spices Powder over the surface of the crust.
From one edge, tightly roll the crust into a log shape, with the green onions to the inside. With the log completed, take one end and roll into a circle so the dough has the appearance of something like a cinnamon roll.
Now, once more, roll the dough out with a rolling pin into a flat round shape. A good time to remember not to make it larger than the largest skillet you have!!
COOKING
Place a skillet, large enough to hold the pancake, over medium heat. Brush vegetable oil inside the skillet, covering all surfaces. Place the pancake in the skillet and allow to cook for about 2 minutes or until the surface is a nice toasty brown color. Flip the pancake over and do the same on the other side. While the pancake is cooking, use a spatula to press down lightly on the center of the pancake to assure that it is cooked completely through.
SERVING
When removing the pancake from the skillet, place it on a flat cutting surface. Use a knife or preferably a pizza cutter to cut it into several pieces...again, similar to a pizza. Stack the slices on a plate and serve. You may like to use some soy sauce, sweet sauce or other sauce of your choice as a dipping sauce.
This is a very light and tasty Asian breakfast treat. Once you have it down, you can offer something to the family and guests they have probably not tasted before. I hope you enjoy it!! If you do, please share the recipe with family and friends. If you have any questions, please email me at: stan.kain@gmail.com You may also enjoy other recipes on my recipe blog. I try to add new ones quite regularly. Most all the recipes are healthy, inexpensive and easy to make.
INGREDIENTS
1/14 Cups All Purpose Flour
1/2 Cup (+) Water
1/2 Teaspoon Salt
1 Tablespoon Vegetable Oil
1 Scallion - Green Onion (Finely Chopped)
1/2 Teaspoon Chinese Five Spices Powder
PREPARATION
After chopping the green onion, prepare to make the dough. Put the four into a large mixing bowl and boil the water. Boil a little extra water, so you can have enough to get the consistency of the dough as it should be. When the water boils, add the salt and mix so the salt is fully dissolved.
Slowly add the boiled water to the flour, stirring as you do until the consistency is similar to pizza dough. Put the dough aside for about 10 minutes, allowing time for the mixture to cool off enough you can knead it. Knead the dough for about 5 minutes, then set aside for about 20 minutes, allowing it to rest.
Return to the dough, kneading it for another couple of minutes, then roll out into a flat circle, similar to a pie crust or thin pizza crust. With the dough rolled out, brush a little vegetable oil on the surface, then sprinkle the chopped green onions all over the surface of the crust. Follow by sprinkling the Five Spices Powder over the surface of the crust.
From one edge, tightly roll the crust into a log shape, with the green onions to the inside. With the log completed, take one end and roll into a circle so the dough has the appearance of something like a cinnamon roll.
Now, once more, roll the dough out with a rolling pin into a flat round shape. A good time to remember not to make it larger than the largest skillet you have!!
COOKING
Place a skillet, large enough to hold the pancake, over medium heat. Brush vegetable oil inside the skillet, covering all surfaces. Place the pancake in the skillet and allow to cook for about 2 minutes or until the surface is a nice toasty brown color. Flip the pancake over and do the same on the other side. While the pancake is cooking, use a spatula to press down lightly on the center of the pancake to assure that it is cooked completely through.
SERVING
When removing the pancake from the skillet, place it on a flat cutting surface. Use a knife or preferably a pizza cutter to cut it into several pieces...again, similar to a pizza. Stack the slices on a plate and serve. You may like to use some soy sauce, sweet sauce or other sauce of your choice as a dipping sauce.
This is a very light and tasty Asian breakfast treat. Once you have it down, you can offer something to the family and guests they have probably not tasted before. I hope you enjoy it!! If you do, please share the recipe with family and friends. If you have any questions, please email me at: stan.kain@gmail.com You may also enjoy other recipes on my recipe blog. I try to add new ones quite regularly. Most all the recipes are healthy, inexpensive and easy to make.
Tuesday, June 20, 2017
Bone Broth - Chicken And Beef
This is about as old and basic recipe as you can find anywhere. Bone broth probably goes back to when our first cave ancestors learned about fire for cooking their game. It provided a means for them to get ALL nutrition from their catch and was tasty, as well. Many of the Asian dishes I prepare begin with either vegetable, chicken or beef broth as a base ingredient. Same when preparing some of the soups I enjoy in winter. Of course you can always pick up a can or jar of beef stock or broth (same thing) at the grocery store, but it's certainly lacking in many of the nutritional qualities as well as flavor! Why not prepare your own broth and freeze it for use when you need it? Or, as a comforting drink when you have a bad cold or the flu. Some nutritionists will argue as to the health qualities of broth, but there's hardly a culture in the world without a home remedy for colds and flu which doesn't include something like chicken soup.
The important part of making healthful bone broth is to remember that we're going to get all the vitamins, minerals and food value out of the bones and the bone marrow. Not a common practice today, but I remember as a kid....my mother would boil up a batch of big soup bones and my dad would crack them to extract the bone marrow. He would spread it on a slice of bread and we would eat it....really was pretty good as I recall. Just one of those funny old time treats, I suppose.
Anyway, preparing and storing bone broth for when you need it is quite easy, especially if you have a slow cooker or crock pot. You'll find the broth to be more flavorful, by far and healthier, too. And you save a bit of money since you're not buying the broth from the grocery store. The recipe I'm going to share applies to using either beef bones or chicken/turkey bones.
INGREDIENTS
3 - Pounds of beef or chicken/turkey bones
12 Cups Water
1 1/2 Cups Coarsely Chopped Carrots
1 1/2 Cups Coarsely Chopped Leeks
1 Medium White Onion
6 Cloves Fresh Garlic
2 Tablespoons Apple Cider Vinegar
1/2 Teaspoon Bay Leaves
1 Teaspoon Rosemary
1 Teaspoon Black peppercorns
PREPARATION
Simmer bones in a stock pot for about 20 minutes to remove unwanted bits of meat and debris on bones.
Place the bones on a baking sheet in an oven preheated to 450 F degrees. Turn the bones after 20 minutes and continue to cook for an additional 20 minutes.
Pour water into a large stock pot and add the bones, covering them with water. Add the vinegar, cover the pot and allow it to sit for about 30 minutes at room temperature. Bring to a boil then reduce to a simmer. At this time, transfer the contents of the stock pot to a crock pot or slow cooker. Cover the cooker and allow the bones to continue to simmer.*
*Chicken bones/turkey bones should be allowed to continue to simmer in the crock pot for 24 hours. Beef bones should be allowed to do the same for 48 hours. This is how we get all the nutrition out of the marrow of the bones. After the first 2 -3 hours of simmering, remove the foamy layer which forms on the top of the broth.
Add vegetables and spices to the stock pot or crock pot about 8 hours before they are done cooking. This keeps the vegetables from dissolving into the broth, but still imparts the flavor.
When the broth has cooked completely, remove all the vegetables and bones from the crock pot. Strain the broth through a fine screen mesh strainer to remove the larger remaining particles. For a clearer broth, you may choose to strain the broth once more through a cloth strainer.
Pour the broth into a large container and place in the refrigerator overnight. The following day, remove the layer of fat which has risen to the top and set up on the broth. The broth will be gelatinous, since you have extracted all the nutrition and bone marrow value. Just warm it up and it will return to a liquid state.
Pour the broth into freezer quality containers, label it and store it in the freezer for use when you wish to make soup or recipes call for broth. You'll be using the best broth possible, just as expensive restaurants do in their dishes.
** Just a tip from here. We have a small, local butcher shop close to the house. They welcome you to come there and get all the beef and pork bones you want....at no charge. They have barrels and barrels of them as they butcher....and there is a lot of meat left on the rib bones. Also, there are excellent large bones with marrow. You are permitted to go through the bones yourself and get the ones you want. They are for pets, but the bones also work wonderfully for beef broth and don't cost a cent! Check with local small butchers and see if you can't find a similar opportunity.
I hope you'll give this excellent bone broth a try and share the recipe with family and friends. If you have any questions, please email me at: stan.kain@gmail.com Also, check out my recipe blog for many great and simple, but healthy and inexpensive recipes. I'm sure you'll find something there you enjoy!!!
The important part of making healthful bone broth is to remember that we're going to get all the vitamins, minerals and food value out of the bones and the bone marrow. Not a common practice today, but I remember as a kid....my mother would boil up a batch of big soup bones and my dad would crack them to extract the bone marrow. He would spread it on a slice of bread and we would eat it....really was pretty good as I recall. Just one of those funny old time treats, I suppose.
Anyway, preparing and storing bone broth for when you need it is quite easy, especially if you have a slow cooker or crock pot. You'll find the broth to be more flavorful, by far and healthier, too. And you save a bit of money since you're not buying the broth from the grocery store. The recipe I'm going to share applies to using either beef bones or chicken/turkey bones.
INGREDIENTS
3 - Pounds of beef or chicken/turkey bones
12 Cups Water
1 1/2 Cups Coarsely Chopped Carrots
1 1/2 Cups Coarsely Chopped Leeks
1 Medium White Onion
6 Cloves Fresh Garlic
2 Tablespoons Apple Cider Vinegar
1/2 Teaspoon Bay Leaves
1 Teaspoon Rosemary
1 Teaspoon Black peppercorns
PREPARATION
Simmer bones in a stock pot for about 20 minutes to remove unwanted bits of meat and debris on bones.
Place the bones on a baking sheet in an oven preheated to 450 F degrees. Turn the bones after 20 minutes and continue to cook for an additional 20 minutes.
Pour water into a large stock pot and add the bones, covering them with water. Add the vinegar, cover the pot and allow it to sit for about 30 minutes at room temperature. Bring to a boil then reduce to a simmer. At this time, transfer the contents of the stock pot to a crock pot or slow cooker. Cover the cooker and allow the bones to continue to simmer.*
*Chicken bones/turkey bones should be allowed to continue to simmer in the crock pot for 24 hours. Beef bones should be allowed to do the same for 48 hours. This is how we get all the nutrition out of the marrow of the bones. After the first 2 -3 hours of simmering, remove the foamy layer which forms on the top of the broth.
Add vegetables and spices to the stock pot or crock pot about 8 hours before they are done cooking. This keeps the vegetables from dissolving into the broth, but still imparts the flavor.
When the broth has cooked completely, remove all the vegetables and bones from the crock pot. Strain the broth through a fine screen mesh strainer to remove the larger remaining particles. For a clearer broth, you may choose to strain the broth once more through a cloth strainer.
Pour the broth into a large container and place in the refrigerator overnight. The following day, remove the layer of fat which has risen to the top and set up on the broth. The broth will be gelatinous, since you have extracted all the nutrition and bone marrow value. Just warm it up and it will return to a liquid state.
Pour the broth into freezer quality containers, label it and store it in the freezer for use when you wish to make soup or recipes call for broth. You'll be using the best broth possible, just as expensive restaurants do in their dishes.
** Just a tip from here. We have a small, local butcher shop close to the house. They welcome you to come there and get all the beef and pork bones you want....at no charge. They have barrels and barrels of them as they butcher....and there is a lot of meat left on the rib bones. Also, there are excellent large bones with marrow. You are permitted to go through the bones yourself and get the ones you want. They are for pets, but the bones also work wonderfully for beef broth and don't cost a cent! Check with local small butchers and see if you can't find a similar opportunity.
I hope you'll give this excellent bone broth a try and share the recipe with family and friends. If you have any questions, please email me at: stan.kain@gmail.com Also, check out my recipe blog for many great and simple, but healthy and inexpensive recipes. I'm sure you'll find something there you enjoy!!!
Monday, June 19, 2017
Teriyaki Chicken Thighs
This is an easy, low cost and healthy main course with an Asian touch of flavor. If you like chicken, I think you will enjoy this simple dinner entree. There's really nothing difficult to preparing it....just make a simple marinade and remember to allow the chicken thighs to marinate overnight before cooking.
INGREDIENTS
6 - 8 chicken thighs - skin on
MARINADE INGREDIENTS
1/2 Cup Soy Sauce
1/2 Cup Brown Sugar
1/4 Cup Green Onions (diced)
2 Cloves Minced Garlic (or substitute with garlic powder)
1 1/2 inch Fresh Minced Ginger (or substitute with ginger powder)
1 Tablespoon Sesame Oil
1 Tablespoon Sesame Seed
PREPARATION
Rinse chicken thighs and thoroughly dry them with paper towels
Put all marinade ingredients into a bowl, saving some of the green onions and sesame seed for the finished dish. Whisk and mix the marinade ingredients thoroughly, making sure the sugar has all dissolved.
Pour marinade into a plastic Ziploc bag and add the chicken thighs.. Seal the bag and make sure the marinade thoroughly coats the chicken. Put into the refrigerator for 12 -24 hours. Turn the bag a few times to make sure marinade infuses all the chicken thighs.
COOKING
Place the chicken thighs into an oven safe baking dish...one layer deep. Keep the marinade for use at the end of baking. In a preheated oven, bake the chicken at 325 F degrees for 1 hour. Check the chicken at the end of an hour to be sure it's completely cooked.
Pour the marinade over the chicken thighs when they are cooked, then allow to bake for another 15 minutes. If you like a crispier skin, you may put the thighs under the oven broiler for about 5 minutes at the end of the cooking process.
Remove the chicken from the oven and sprinkle some Sesame Seed and diced Green Onions over all the pieces before serving.
This is a very tasty and low cost dish if you enjoy a touch of Asian flavor. If you enjoy the recipe, please feel free to share it with family and friends. If you have any questions, you may email me at: stan.kain@gmail.com Please check my recipe blog for many other delicious and healthy recipe ideas. Enjoy!!!
INGREDIENTS
6 - 8 chicken thighs - skin on
MARINADE INGREDIENTS
1/2 Cup Soy Sauce
1/2 Cup Brown Sugar
1/4 Cup Green Onions (diced)
2 Cloves Minced Garlic (or substitute with garlic powder)
1 1/2 inch Fresh Minced Ginger (or substitute with ginger powder)
1 Tablespoon Sesame Oil
1 Tablespoon Sesame Seed
PREPARATION
Rinse chicken thighs and thoroughly dry them with paper towels
Put all marinade ingredients into a bowl, saving some of the green onions and sesame seed for the finished dish. Whisk and mix the marinade ingredients thoroughly, making sure the sugar has all dissolved.
Pour marinade into a plastic Ziploc bag and add the chicken thighs.. Seal the bag and make sure the marinade thoroughly coats the chicken. Put into the refrigerator for 12 -24 hours. Turn the bag a few times to make sure marinade infuses all the chicken thighs.
COOKING
Place the chicken thighs into an oven safe baking dish...one layer deep. Keep the marinade for use at the end of baking. In a preheated oven, bake the chicken at 325 F degrees for 1 hour. Check the chicken at the end of an hour to be sure it's completely cooked.
Pour the marinade over the chicken thighs when they are cooked, then allow to bake for another 15 minutes. If you like a crispier skin, you may put the thighs under the oven broiler for about 5 minutes at the end of the cooking process.
Remove the chicken from the oven and sprinkle some Sesame Seed and diced Green Onions over all the pieces before serving.
This is a very tasty and low cost dish if you enjoy a touch of Asian flavor. If you enjoy the recipe, please feel free to share it with family and friends. If you have any questions, you may email me at: stan.kain@gmail.com Please check my recipe blog for many other delicious and healthy recipe ideas. Enjoy!!!
Chinese Egg Foo Young - Basic Recipe
One Chinese dish I really enjoy is Egg Foo Young. I find it more and more difficult to get at Chinese buffets, but making it at home is super easy. Egg Foo Young is really a versatile dish, great for breakfast or as a side dish at other meals.
Egg Foo Young offers an opportunity to be as creative as you like, using most any kind of meat....or meatless if you prefer....and a variety of vegetable choices. For me, there are only a few certain items which "must" be in Egg Foo Young. I'm going to offer you a basic recipe here and recommend that you experiment from there. Most any meat or seafood works well. Yesterday, while preparing some Egg Foo Young, I had some artificial crab meat in the refrigerator, so diced it up well and used it. Even that worked very well!!!
There are two parts to Egg Foo Young.....the Egg Foo Young itself and the sauce which is poured over it. I'll explain each in detail so you have complete, authentic tasting dish.
INGREDIENTS - EGG FOO YOUNG
6 Eggs
1/3 Cup Bean Sprouts
2 Green Onions (finely diced)
1 Cup Meat of your choice diced *
1/8 Teaspoon Salt
1/8 Teaspoon White Pepper
1/3 Cup Diced Mushrooms (optional)
2 -6 Tablespoons Vegetable Oil
* I recommend using shrimp (the tiny canned variety works fine), thinly sliced and diced pork or artificial crab or lobster.
INGREDIENTS - SAUCE
1/2 Cup Vegetable Broth
1 Tablespoon Soy Sauce
1 Tablespoon Rice Vinegar
1 1/2 Tablespoons White Sugar
1/2 Teaspoons Corn Starch
SAUCE PREPARATION
Put all the sauce ingredients into a small saucepan on low-medium heat. Whisk well until the sauce thickens, then remove from the heat and put in a bowl to be spooned over the Egg Foo Young.
EGG FOO YOUNG PREPARATION
Put all of the ingredients for the Egg Foo Young, except the vegetable oil, into a bowl. Using a whisk, mix all the ingredients together. Continue whisking until all ingredients are thoroughly mixed and blended with the eggs.
Place a frying pan on the range at medium heat. Non sticking is best. Add enough vegetable oil to just cover the bottom of the frying pan. I prefer using a smaller frying pan....something like a 7 inch omelette pan.
When the oil is hot, ladle one scoop of Egg Foo Young mix into the pan. Enough to make a patty about 6 inches in diameter. As the edges of the patty begin to set, I use the spatula to go around the edges, pulling the mixture back into the center just enough to make a nice round patty.
Allow the Egg Foo Young mixture to cook for about 3 - 4 minutes....long enough for the surface to get a nice golden brown color. The mixture will get a bit of a fluffy appearance as it cooks. Flip the Egg Foo Young over and allow the other side to cook in the same manner. When finished, remove and set aside while cooking additional patties. Add some additional vegetable oil with each patty. You don't want to saturate the patties with oil or deep fat fry them....just enough to keep them from sticking to the pan and to give a golden browning to the patty.
When finished, serve the Egg Foo Young on a plate and spoon the sauce over the top before eating. I think these are as good or better than I've had at most Chinese restaurants. Enjoy!! It couldn't be easier!!
Please feel free to share the recipe with family and friends if you enjoy it. If you have any questions, you may email me at: stan.kain@gmail.com Don't hesitate to be creative in using different ingredients you may enjoy!!!
Egg Foo Young offers an opportunity to be as creative as you like, using most any kind of meat....or meatless if you prefer....and a variety of vegetable choices. For me, there are only a few certain items which "must" be in Egg Foo Young. I'm going to offer you a basic recipe here and recommend that you experiment from there. Most any meat or seafood works well. Yesterday, while preparing some Egg Foo Young, I had some artificial crab meat in the refrigerator, so diced it up well and used it. Even that worked very well!!!
There are two parts to Egg Foo Young.....the Egg Foo Young itself and the sauce which is poured over it. I'll explain each in detail so you have complete, authentic tasting dish.
INGREDIENTS - EGG FOO YOUNG
6 Eggs
1/3 Cup Bean Sprouts
2 Green Onions (finely diced)
1 Cup Meat of your choice diced *
1/8 Teaspoon Salt
1/8 Teaspoon White Pepper
1/3 Cup Diced Mushrooms (optional)
2 -6 Tablespoons Vegetable Oil
* I recommend using shrimp (the tiny canned variety works fine), thinly sliced and diced pork or artificial crab or lobster.
INGREDIENTS - SAUCE
1/2 Cup Vegetable Broth
1 Tablespoon Soy Sauce
1 Tablespoon Rice Vinegar
1 1/2 Tablespoons White Sugar
1/2 Teaspoons Corn Starch
SAUCE PREPARATION
Put all the sauce ingredients into a small saucepan on low-medium heat. Whisk well until the sauce thickens, then remove from the heat and put in a bowl to be spooned over the Egg Foo Young.
EGG FOO YOUNG PREPARATION
Put all of the ingredients for the Egg Foo Young, except the vegetable oil, into a bowl. Using a whisk, mix all the ingredients together. Continue whisking until all ingredients are thoroughly mixed and blended with the eggs.
Place a frying pan on the range at medium heat. Non sticking is best. Add enough vegetable oil to just cover the bottom of the frying pan. I prefer using a smaller frying pan....something like a 7 inch omelette pan.
When the oil is hot, ladle one scoop of Egg Foo Young mix into the pan. Enough to make a patty about 6 inches in diameter. As the edges of the patty begin to set, I use the spatula to go around the edges, pulling the mixture back into the center just enough to make a nice round patty.
Allow the Egg Foo Young mixture to cook for about 3 - 4 minutes....long enough for the surface to get a nice golden brown color. The mixture will get a bit of a fluffy appearance as it cooks. Flip the Egg Foo Young over and allow the other side to cook in the same manner. When finished, remove and set aside while cooking additional patties. Add some additional vegetable oil with each patty. You don't want to saturate the patties with oil or deep fat fry them....just enough to keep them from sticking to the pan and to give a golden browning to the patty.
When finished, serve the Egg Foo Young on a plate and spoon the sauce over the top before eating. I think these are as good or better than I've had at most Chinese restaurants. Enjoy!! It couldn't be easier!!
Please feel free to share the recipe with family and friends if you enjoy it. If you have any questions, you may email me at: stan.kain@gmail.com Don't hesitate to be creative in using different ingredients you may enjoy!!!
Sunday, June 4, 2017
Chinese Crispy Roast Chicken
This treat was on my dinner table last night....and is at the very least, in the "top ten" of meals. There's some "good news," "bad news" here....but don't leave yet!!! The "bad news" is that it takes at least two days to get the chicken ready for the table! The "good news" is that there really isn't much work to it....it's just a bit time consuming. In the end, it's worth the time and if you try it once, you'll cook it again! There are some simple, but VERY IMPORTANT rules to follow...and I'll share them with you. By the way, I had "midnight raiders" in the refrigerator last night...making a second attack on the chicken. It's just delicious!!!
INGREDIENTS
1 Medium Size Roasting Chicken
1/4 Cup White Vinegar
(The rest of the ingredients are all for the marinade)
4 Cloves fresh garlic
1 inch piece of fresh ginger
1 Teaspoon Chinese Five Spice (you should be able to get from any Asian market. Goes in many dishes)
1 Teaspoons Salt
1 Tablespoon Brown Sugar
1/2 Cup Soy Sauce
2 Green Scallions (Onions)
PREPARATION
Wash and rinse the chicken, removing any large pieces of fat from the meat. Allow the chicken to soak in fresh water for about 30 minutes when finished.
Remove the chicken from the water...let drain well....then rub the vinegar into the entire chicken. Be sure to rub the vinegar into the inside cavity as well as the outside of the chicken. Set the chicken aside and allow it to rest for about 15 minutes. During this time, make the marinade.
Put all of the marinade ingredients into a measuring cup or something you can use which is easy to pour. Dice the ginger and garlic and green scallions before adding to the marinade. Set the marinade aside and get ready to work with the chicken again.
After the chicken has rested from the vinegar rub, it must be thoroughly dried. THIS IS A VERY IMPORTANT STEP TO GET A GOOD CHICKEN! Use paper towels or whatever you like which will really absorb the moisture!!! Dry the inside cavity and the outside of the chicken, removing all moisture from the surface!!! Get the chicken as dry as possible!!
Stand the chicken up in a one gallon plastic Ziploc bag and pour about half the marinade into the chicken body cavity. Now, pour the remainder of marinade into the bag around and over the chicken. Seal the Ziploc bag and put the chicken into the refrigerator. Marinate for AT LEAST 48 HOURS! When you open the refrigerator, flip the chicken over a few times during the 48 hours to ensure that it is completely coated with marinade. This marinade penetrates deeply and you will love the flavor through the chicken!
PREPARING TO ROAST
When ready to roast, remove the chicken from the Ziploc bag and discard the marinade. We're going to dry the chicken again....and at this stage, COMPLETE DRYING IS VERY, VERY IMPORTANT!! If you don't do it right, you won't have CRISPY roast chicken! Again, I use paper towels to dry the body cavity and exterior of the chicken. At the same time, I remove any remaining garlic, ginger and scallions left over from the marinade. Remember....get the chicken as dry as possible!
Take a small knife with a very sharp pointed blade and make some holes in the skin of the chicken around the joints between the body and legs. MAKE SURE TO DO THIS CAREFULLY, ONLY MAKING THE HOLE THROUGH THE SKIN AND NOT INTO THE MEAT. The holes do not have to be large but should be put in any fatty areas of the chicken. They will allow the fat to drain off while the chicken is roasting. This is very similar to the process for making good roast duck.
We are now going to further dry the chicken. Get creative here. You want this chicken to be DRY! Having cats, as I do, it's a bit of a challenge. I put the chicken in a spare bedroom and place it close to and in the direct path of the air from a big box fan. I find that complete drying takes about 4 hours....but this will vary depending upon temperature and humidity. As the skin of the chicken dries, you will see it tighten up around the chicken and it will be dry to the touch. Thanks to the marinade, the skin of the chicken will have a color very similar to the Donald Trump face tan. No offense meant, but that's exactly how it looks! Once completely dry to the touch, the chicken is ready to roast! I know...you're having nightmares about leaving a raw chicken out at room temperature for something like 4 hours!!! Have no fear!!! It's NOT going to kill you!!! Chinese people have been doing this for eons!!! Remember...you have saturated the chicken with vinegar, salt and spices....all of which will inhibit any evil microbes taking over. I ate this chicken last night and I'm still sitting here writing this today!
ROASTING
This will vary some, depending upon the size of your chicken. Preheat the oven to 400 F degrees. Place the chicken on a roasting rack with a pan below to catch any fat...and place an oven rack at the lowest setting in the oven. Place the chicken in the oven and allow it to bake for about 45 minutes. I flip the chicken over about half way through the baking cycle.
When the baking time is up, turn the oven temperature down to 250 F degrees and continue to bake the chicken for another 40 minutes. Again, I flip the chicken over, halfway through the baking cycle. You can always be sure the chicken is cooked, using a temperature probe if you have any doubts.
When finished baking, remove the chicken from the oven and place it on a platter. Allow it to rest for 15 minutes before serving. Whatever you do, pull some of the crispy skin off the chicken and savor the flavor!!! You may either carve the chicken, or pull it from the carcass....eating it with your fingers. I would HIGHLY recommend that you make some of my sweet fruit sauce for dipping the chicken, as it was absolutely wonderful!!! You'll find the recipe on my recipe blog.
I truly hope you will give this roast chicken a try. It really isn't a lot of work....just takes a lot of time for it to marinate and a bit of time to make sure you thoroughly dry the chicken at two stages of preparation. That's about it. I get nothing but raves about how wonderful it tastes. If you enjoy it, please share the recipe with family and friends. And if you have any questions, feel free to email me at: stan.kain@gmail.com I recommend that you browse my recipe blog as there are many recipes there I use and enjoy around here....and they are all easy to prepare, healthy to eat and inexpensive. I consider healthy eating to be some of the best medicine in the world!

INGREDIENTS
1 Medium Size Roasting Chicken
1/4 Cup White Vinegar
(The rest of the ingredients are all for the marinade)
4 Cloves fresh garlic
1 inch piece of fresh ginger
1 Teaspoon Chinese Five Spice (you should be able to get from any Asian market. Goes in many dishes)
1 Teaspoons Salt
1 Tablespoon Brown Sugar
1/2 Cup Soy Sauce
2 Green Scallions (Onions)
PREPARATION
Wash and rinse the chicken, removing any large pieces of fat from the meat. Allow the chicken to soak in fresh water for about 30 minutes when finished.
Remove the chicken from the water...let drain well....then rub the vinegar into the entire chicken. Be sure to rub the vinegar into the inside cavity as well as the outside of the chicken. Set the chicken aside and allow it to rest for about 15 minutes. During this time, make the marinade.
Put all of the marinade ingredients into a measuring cup or something you can use which is easy to pour. Dice the ginger and garlic and green scallions before adding to the marinade. Set the marinade aside and get ready to work with the chicken again.
After the chicken has rested from the vinegar rub, it must be thoroughly dried. THIS IS A VERY IMPORTANT STEP TO GET A GOOD CHICKEN! Use paper towels or whatever you like which will really absorb the moisture!!! Dry the inside cavity and the outside of the chicken, removing all moisture from the surface!!! Get the chicken as dry as possible!!
Stand the chicken up in a one gallon plastic Ziploc bag and pour about half the marinade into the chicken body cavity. Now, pour the remainder of marinade into the bag around and over the chicken. Seal the Ziploc bag and put the chicken into the refrigerator. Marinate for AT LEAST 48 HOURS! When you open the refrigerator, flip the chicken over a few times during the 48 hours to ensure that it is completely coated with marinade. This marinade penetrates deeply and you will love the flavor through the chicken!
PREPARING TO ROAST
When ready to roast, remove the chicken from the Ziploc bag and discard the marinade. We're going to dry the chicken again....and at this stage, COMPLETE DRYING IS VERY, VERY IMPORTANT!! If you don't do it right, you won't have CRISPY roast chicken! Again, I use paper towels to dry the body cavity and exterior of the chicken. At the same time, I remove any remaining garlic, ginger and scallions left over from the marinade. Remember....get the chicken as dry as possible!
Take a small knife with a very sharp pointed blade and make some holes in the skin of the chicken around the joints between the body and legs. MAKE SURE TO DO THIS CAREFULLY, ONLY MAKING THE HOLE THROUGH THE SKIN AND NOT INTO THE MEAT. The holes do not have to be large but should be put in any fatty areas of the chicken. They will allow the fat to drain off while the chicken is roasting. This is very similar to the process for making good roast duck.
We are now going to further dry the chicken. Get creative here. You want this chicken to be DRY! Having cats, as I do, it's a bit of a challenge. I put the chicken in a spare bedroom and place it close to and in the direct path of the air from a big box fan. I find that complete drying takes about 4 hours....but this will vary depending upon temperature and humidity. As the skin of the chicken dries, you will see it tighten up around the chicken and it will be dry to the touch. Thanks to the marinade, the skin of the chicken will have a color very similar to the Donald Trump face tan. No offense meant, but that's exactly how it looks! Once completely dry to the touch, the chicken is ready to roast! I know...you're having nightmares about leaving a raw chicken out at room temperature for something like 4 hours!!! Have no fear!!! It's NOT going to kill you!!! Chinese people have been doing this for eons!!! Remember...you have saturated the chicken with vinegar, salt and spices....all of which will inhibit any evil microbes taking over. I ate this chicken last night and I'm still sitting here writing this today!
ROASTING
This will vary some, depending upon the size of your chicken. Preheat the oven to 400 F degrees. Place the chicken on a roasting rack with a pan below to catch any fat...and place an oven rack at the lowest setting in the oven. Place the chicken in the oven and allow it to bake for about 45 minutes. I flip the chicken over about half way through the baking cycle.
When the baking time is up, turn the oven temperature down to 250 F degrees and continue to bake the chicken for another 40 minutes. Again, I flip the chicken over, halfway through the baking cycle. You can always be sure the chicken is cooked, using a temperature probe if you have any doubts.
When finished baking, remove the chicken from the oven and place it on a platter. Allow it to rest for 15 minutes before serving. Whatever you do, pull some of the crispy skin off the chicken and savor the flavor!!! You may either carve the chicken, or pull it from the carcass....eating it with your fingers. I would HIGHLY recommend that you make some of my sweet fruit sauce for dipping the chicken, as it was absolutely wonderful!!! You'll find the recipe on my recipe blog.
I truly hope you will give this roast chicken a try. It really isn't a lot of work....just takes a lot of time for it to marinate and a bit of time to make sure you thoroughly dry the chicken at two stages of preparation. That's about it. I get nothing but raves about how wonderful it tastes. If you enjoy it, please share the recipe with family and friends. And if you have any questions, feel free to email me at: stan.kain@gmail.com I recommend that you browse my recipe blog as there are many recipes there I use and enjoy around here....and they are all easy to prepare, healthy to eat and inexpensive. I consider healthy eating to be some of the best medicine in the world!

Friday, June 2, 2017
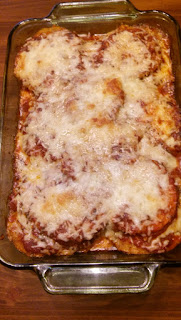
Baked Eggplant Parmesan (No Frying)
One of my favorite vegetables is eggplant, as it is so adaptable in taking on the flavor of just about anything and the texture is very "meaty." Eggplant Parmesan is a popular dish around here and easy to prepare. I'm going to share my recipe and some tips on working with eggplant. I hope you enjoy!
INGREDIENTS
2 Medium Eggplants
Kosher Salt
1 1/2 cups of Panko Bread Crumbs
2 Eggs
1 1/2 cups grated Mozzarella cheese
1 cup grated Parmesan cheese
Cooking spray
Italian Seasoning (To Taste)
Large jar Italian Red Sauce (or your own homemade)
TIP: I recommend the medium size eggplants, as the large ones are full of large seeds and become tough and "woody." The medium ones are much nicer to use and eat.
PREPARATION
Slice the eggplants into slices about 1/2 inch thick. You may choose to peel the skin off or leave it on. Different people have different preferences here.
TIP: Eggplant tends to have a "bitterness" to it. This can easily be removed and I recommend doing so. Put the slices of eggplant into a colander, sprinkling a little Kosher salt on each slice as you add them to the colander. Let the eggplant rest in the colander for about 20 minutes. You'll see some dark colored liquid which is like beads of "sweat" on the eggplant. This is the bitter liquid being removed. Rinse the eggplant in water and dry each piece off completely.
Preheat the over to 425 F degrees. Prepare baking sheets to hold your eggplant slices....with aluminum foil, sprayed with cooking spray to prevent sticking.
Beat the two eggs in a bowl and dip each slice of eggplant, first into the egg, then into the Panko bread crumbs. Place each breaded slice of eggplant onto the baking sheets and into the oven. Cook for 20 minutes, flipping the eggplant slices over after 10 minutes. At the end of 20 minutes, the eggplant slices should look a little "toasty." Remove the eggplant slices from the oven.
Next, prepare an oven safe casserole dish. Cover the bottom of the dish with red sauce. Using the slices of eggplant, make a layer covering the bottom of the casserole dish. Pour another layer of red sauce over the eggplant. Now, sprinkle a layer of shredded Mozzarella cheese over the layer of sauce. Following the Mozzarella cheese, sprinkle a layer of shredded Parmesan cheese, followed by a sprinkling of Italian seasoning. Repeat the process, in layers, until you've used all your eggplant. Top the eggplant off with more red sauce and a layer of Mozzarella and Parmesan cheese. Lastly, sprinkle more Italian seasoning, or if you have fresh herbs such as Basil, Oregano and Thyme, that will work well, too!
BAKING
Put the casserole dish back into the 425 F degree oven for another 15 - 20 minutes. The dish is ready once the cheese has melted and begins to get a toasty look around the edges. After taking the dish out of the oven, allow it to sit for 5 -10 minutes to cool, as it's very hot and will burn you!! Enjoy!!! And all done with no frying and no oil!
If you enjoy this dish, please share it with family and friends. It's a healthy, easy to prepare meal. If you have any questions, please feel free to email me at: stan.kain@gmail.com Happy, healthy dining!
INGREDIENTS
2 Medium Eggplants
Kosher Salt
1 1/2 cups of Panko Bread Crumbs
2 Eggs
1 1/2 cups grated Mozzarella cheese
1 cup grated Parmesan cheese
Cooking spray
Italian Seasoning (To Taste)
Large jar Italian Red Sauce (or your own homemade)
TIP: I recommend the medium size eggplants, as the large ones are full of large seeds and become tough and "woody." The medium ones are much nicer to use and eat.
PREPARATION
Slice the eggplants into slices about 1/2 inch thick. You may choose to peel the skin off or leave it on. Different people have different preferences here.
TIP: Eggplant tends to have a "bitterness" to it. This can easily be removed and I recommend doing so. Put the slices of eggplant into a colander, sprinkling a little Kosher salt on each slice as you add them to the colander. Let the eggplant rest in the colander for about 20 minutes. You'll see some dark colored liquid which is like beads of "sweat" on the eggplant. This is the bitter liquid being removed. Rinse the eggplant in water and dry each piece off completely.
Preheat the over to 425 F degrees. Prepare baking sheets to hold your eggplant slices....with aluminum foil, sprayed with cooking spray to prevent sticking.
Beat the two eggs in a bowl and dip each slice of eggplant, first into the egg, then into the Panko bread crumbs. Place each breaded slice of eggplant onto the baking sheets and into the oven. Cook for 20 minutes, flipping the eggplant slices over after 10 minutes. At the end of 20 minutes, the eggplant slices should look a little "toasty." Remove the eggplant slices from the oven.
Next, prepare an oven safe casserole dish. Cover the bottom of the dish with red sauce. Using the slices of eggplant, make a layer covering the bottom of the casserole dish. Pour another layer of red sauce over the eggplant. Now, sprinkle a layer of shredded Mozzarella cheese over the layer of sauce. Following the Mozzarella cheese, sprinkle a layer of shredded Parmesan cheese, followed by a sprinkling of Italian seasoning. Repeat the process, in layers, until you've used all your eggplant. Top the eggplant off with more red sauce and a layer of Mozzarella and Parmesan cheese. Lastly, sprinkle more Italian seasoning, or if you have fresh herbs such as Basil, Oregano and Thyme, that will work well, too!
BAKING
Put the casserole dish back into the 425 F degree oven for another 15 - 20 minutes. The dish is ready once the cheese has melted and begins to get a toasty look around the edges. After taking the dish out of the oven, allow it to sit for 5 -10 minutes to cool, as it's very hot and will burn you!! Enjoy!!! And all done with no frying and no oil!
If you enjoy this dish, please share it with family and friends. It's a healthy, easy to prepare meal. If you have any questions, please feel free to email me at: stan.kain@gmail.com Happy, healthy dining!

Monday, May 29, 2017
Grilled Teriyaki Salmon
I really enjoy most any seafood and salmon is one of the most readily available where I live, at something close to a reasonable price. I can get it fresh or frozen, most any time. I also have a preference for Asian flavored foods and this simple recipe combines the Asian taste with the enjoyment of salmon.
INGREDIENTS
4 Fillets of Salmon (Fresh or Thawed from frozen)
1/2 Cup Brown Sugar
1/2 Cup Soy Sauce
1 Clove Fresh Garlic (Chopped and Minced)
1 Teaspoon Fresh Ginger (Chopped and Minced)
1 Teaspoon Cornstarch
1 Lemon for Serving
PREPARE MARINADE
Mix brown sugar, soy sauce, garlic and ginger in a bowl. Make sure the brown sugar is completely dissolved and ingredients are well combined. Transfer the marinade into a plastic ziplock bag, large enough to hold the salmon fillets.
Rinse the salmon fillets and pat them dry. Add them to the marinade, making sure the marinade thoroughly coats the fish fillets. Place the bag with the salmon fillets in the refrigerator, leaving them there for at least 20 minutes. Turn the bag once or twice to make sure the marinade thoroughly saturates the fish.
COOKING
You may cook the salmon fillets on either a an outdoor grill or the oven broiler. I have used both. Save the marinade to be used when serving. When cooking, use medium heat. Place the fish on the broiler pan or grill skin side down. Fish is very easy to overcook, so watch the salmon fillets closely!!! When the flesh is flaky, the fish is cooked and ready. The skin will easily remove from the fish when it's properly cooked.
SERVING
Teriyaki grilled salmon goes very well with steamed rice. As a suggestion, place the salmon fillet on top of a bed of steamed rice. Put the saved marinade into a small saucepan and mix 1 teaspoon of cornstarch with 1 tablespoon of cold water in a separate container. Heat the marinade and when it starts to boil, stir in the cornstarch/water mix. Stir well until boiling, then remove from heat. Pour marinade over salmon and bed of steamed rice. Lemon wedges may be served on the side, if desired. Enjoy!!
I hope you enjoy the taste of Teriyaki salmon and if you do, please feel free to share the recipe with friends and family. It's another healthy meal alternative and easy to prepare. If you have questions, feel free to contact me at: stan.kain@gmail.com You may also enjoy many of the other recipes I share on my recipe blog.
INGREDIENTS
4 Fillets of Salmon (Fresh or Thawed from frozen)
1/2 Cup Brown Sugar
1/2 Cup Soy Sauce
1 Clove Fresh Garlic (Chopped and Minced)
1 Teaspoon Fresh Ginger (Chopped and Minced)
1 Teaspoon Cornstarch
1 Lemon for Serving
PREPARE MARINADE
Mix brown sugar, soy sauce, garlic and ginger in a bowl. Make sure the brown sugar is completely dissolved and ingredients are well combined. Transfer the marinade into a plastic ziplock bag, large enough to hold the salmon fillets.
Rinse the salmon fillets and pat them dry. Add them to the marinade, making sure the marinade thoroughly coats the fish fillets. Place the bag with the salmon fillets in the refrigerator, leaving them there for at least 20 minutes. Turn the bag once or twice to make sure the marinade thoroughly saturates the fish.
COOKING
You may cook the salmon fillets on either a an outdoor grill or the oven broiler. I have used both. Save the marinade to be used when serving. When cooking, use medium heat. Place the fish on the broiler pan or grill skin side down. Fish is very easy to overcook, so watch the salmon fillets closely!!! When the flesh is flaky, the fish is cooked and ready. The skin will easily remove from the fish when it's properly cooked.
SERVING
Teriyaki grilled salmon goes very well with steamed rice. As a suggestion, place the salmon fillet on top of a bed of steamed rice. Put the saved marinade into a small saucepan and mix 1 teaspoon of cornstarch with 1 tablespoon of cold water in a separate container. Heat the marinade and when it starts to boil, stir in the cornstarch/water mix. Stir well until boiling, then remove from heat. Pour marinade over salmon and bed of steamed rice. Lemon wedges may be served on the side, if desired. Enjoy!!
I hope you enjoy the taste of Teriyaki salmon and if you do, please feel free to share the recipe with friends and family. It's another healthy meal alternative and easy to prepare. If you have questions, feel free to contact me at: stan.kain@gmail.com You may also enjoy many of the other recipes I share on my recipe blog.
Sunday, May 28, 2017
Easy Caprese Grilled Cheese Sandwich
As something quick and easy for lunch, it's hard to beat a grilled cheese sandwich. I enjoy them, but not the old "Velveeta" generic version, where the cheese resembles some sort of plastic material and there's really not much taste. With just a bit more effort, you can make a very tasty grilled cheese sandwich that is healthier and better tasting. I make a few different versions, but here's one of the standards and always is a good choice!
INGREDIENTS
2 Slices of bread of your choice
1 Tablespoon Olive Oil
2 Tablespoons Basil Pesto
2 Slices Mozzarella Cheese sliced 1/8 inch thick
1 Tomato sliced 1/4 inch thick (I like Roma Tomatoes)
Salt and pepper to taste
PREPARATION
Heat a skillet on medium heat
Brush the outside of each slice of bread with olive oil
Brush the inside of each slice of bread with Basil Pesto
Place cheese slices on the inside of one slice of bread
Top the cheese slices with sliced tomato
Add salt and pepper to taste
Place the second slice of bread, Pesto side down, on top of the tomato slices
COOKING
Place the sandwich into the heated skillet and and allow bread to brown and toast before turning over. Turn sandwich over and allow the other slice of bread to toast and the cheese to melt. Remove sandwich from the skillet and enjoy while it's hot and the cheese is melted.
NOTE
While the skillet is an old standby and has been used for years, my favorite way to make grilled sandwiches is to use my sandwich grilling press. It looks a bit like a waffle iron and seals the edges of the sandwich while it cooks. The light comes on as soon as the sandwich is done, so there's no doubt and the sandwich is cut into two sections while cooking. While the cooking process is the same, the sandwich is more appealing to the eye and easier to handle!
I hope you will give the Caprese Grilled Sandwich a try. It's a tasty alternative and really is no more trouble to prepare. If you enjoy the recipe, please feel free to share it with family and friends. If you have any questions, feel free to email me at: stan.kain@gmail.com I also invite you to check out my recipe blog where you will find many healthy, inexpensive and easy recipes to try. I offer a lot of good tips about cooking and many vegetarian alternatives to using red meat. You may be surprised at how delicious they really are!!!
INGREDIENTS
2 Slices of bread of your choice
1 Tablespoon Olive Oil
2 Tablespoons Basil Pesto
2 Slices Mozzarella Cheese sliced 1/8 inch thick
1 Tomato sliced 1/4 inch thick (I like Roma Tomatoes)
Salt and pepper to taste
PREPARATION
Heat a skillet on medium heat
Brush the outside of each slice of bread with olive oil
Brush the inside of each slice of bread with Basil Pesto
Place cheese slices on the inside of one slice of bread
Top the cheese slices with sliced tomato
Add salt and pepper to taste
Place the second slice of bread, Pesto side down, on top of the tomato slices
COOKING
Place the sandwich into the heated skillet and and allow bread to brown and toast before turning over. Turn sandwich over and allow the other slice of bread to toast and the cheese to melt. Remove sandwich from the skillet and enjoy while it's hot and the cheese is melted.
NOTE
While the skillet is an old standby and has been used for years, my favorite way to make grilled sandwiches is to use my sandwich grilling press. It looks a bit like a waffle iron and seals the edges of the sandwich while it cooks. The light comes on as soon as the sandwich is done, so there's no doubt and the sandwich is cut into two sections while cooking. While the cooking process is the same, the sandwich is more appealing to the eye and easier to handle!
I hope you will give the Caprese Grilled Sandwich a try. It's a tasty alternative and really is no more trouble to prepare. If you enjoy the recipe, please feel free to share it with family and friends. If you have any questions, feel free to email me at: stan.kain@gmail.com I also invite you to check out my recipe blog where you will find many healthy, inexpensive and easy recipes to try. I offer a lot of good tips about cooking and many vegetarian alternatives to using red meat. You may be surprised at how delicious they really are!!!
Saturday, May 27, 2017
Vegetarian Beef Jerky
This is a great recipe if you're trying to cut back on meat in your diet but still miss some of the old favorites. It's also great for someone who is vegetarian or enjoys a healthy vegetable snack. Two of my favorite meat substitutes are Portobello mushrooms and Eggplant. I use them in a lot of recipes because they mimic the taste and texture of meat and whatever you choose for flavor. Eggplant will take on the flavor of most anything you like and it's a healthy, inexpensive vegetable to use.
I've cut way back in the use of beef, especially, in my diet and use the alternative mushrooms and eggplant. One of my favorites is a Portobello mushroom Beef Stroganoff and the recipe is here in the recipe blog. I've had rave reviews from people who've eaten it here. They can't tell the difference! Since eggplant is so versatile, I thought I'd share a great eggplant alternative for beef jerky. Naturally, you can make a marinade out of anything you like....even using beef stock to amplify the beef flavoring, if you like. It's all a matter of taste. I'll share the marinade I like here and it is very "beef like" without any meat product. The texture of the eggplant is very close to meat jerky and I think you will enjoy it!
INGREDIENTS
1 Pound Eggplant
1/2 Cup Soy Sauce
2 Tablespoons Honey
1/2 Teaspoon Liquid Smoke
PREPARATION
Slice the eggplant into 1/8th inch thick slices. Cut into piece about 2 inches by 3 inches in size for easy drying.
Make a marinade using the Soy Sauce, Honey and Liquid Smoke. When mixed together, pour into a large Ziplock plastic bag. Add the sliced eggplant to the bag and make sure the marinade covers all of the eggplant. Place the bag of eggplant in the refrigerator for at least 2 hours, turning the bag once or twice to make sure the eggplant is thoroughly marinated.
MAKING JERKY
When the eggplant is marinated, remove it and discard the marinade. It's time to dry the eggplant and turn it into jerky. The easiest way is to use a dehydrator, if you have one. It's one of the handiest items I have in the kitchen and I use it for a lot of foods and herbs. If you don't have a dehydrator, you can always dry the eggplant in the oven. Just remember it will take longer to dry.
If you're using an oven, place the slices of eggplant on baking racks....one layer deep. Set the oven at 115 F degrees or as low as you can set it. Whether you're using a dehydrator or the oven, keep checking the eggplant for dryness. The eggplant is ready once it's dry and chewy. You can put the extra eggplant jerky in Ziplock bags, sealing out the air and it will keep for about a month. You'll probably eat it up well before that!
Anyway, this is a good basic recipe and a marinade I use. Feel free to use your own imagination and taste to flavor the eggplant the way you like. Eggplant is very forgiving and accepts most any flavor you add. This is one of the qualities I really like about it!!
Please feel free to share the recipe with family and friends if you enjoy it. If you have any questions, you may email me at: stan.kain@gmail.com Please visit my recipe blog and try some of the healthy, easy and inexpensive recipes I share there. I really try to focus on healthy alternatives in cooking and sharing foods from many different cultures. Enjoy!!!
I've cut way back in the use of beef, especially, in my diet and use the alternative mushrooms and eggplant. One of my favorites is a Portobello mushroom Beef Stroganoff and the recipe is here in the recipe blog. I've had rave reviews from people who've eaten it here. They can't tell the difference! Since eggplant is so versatile, I thought I'd share a great eggplant alternative for beef jerky. Naturally, you can make a marinade out of anything you like....even using beef stock to amplify the beef flavoring, if you like. It's all a matter of taste. I'll share the marinade I like here and it is very "beef like" without any meat product. The texture of the eggplant is very close to meat jerky and I think you will enjoy it!
INGREDIENTS
1 Pound Eggplant
1/2 Cup Soy Sauce
2 Tablespoons Honey
1/2 Teaspoon Liquid Smoke
PREPARATION
Slice the eggplant into 1/8th inch thick slices. Cut into piece about 2 inches by 3 inches in size for easy drying.
Make a marinade using the Soy Sauce, Honey and Liquid Smoke. When mixed together, pour into a large Ziplock plastic bag. Add the sliced eggplant to the bag and make sure the marinade covers all of the eggplant. Place the bag of eggplant in the refrigerator for at least 2 hours, turning the bag once or twice to make sure the eggplant is thoroughly marinated.
MAKING JERKY
When the eggplant is marinated, remove it and discard the marinade. It's time to dry the eggplant and turn it into jerky. The easiest way is to use a dehydrator, if you have one. It's one of the handiest items I have in the kitchen and I use it for a lot of foods and herbs. If you don't have a dehydrator, you can always dry the eggplant in the oven. Just remember it will take longer to dry.
If you're using an oven, place the slices of eggplant on baking racks....one layer deep. Set the oven at 115 F degrees or as low as you can set it. Whether you're using a dehydrator or the oven, keep checking the eggplant for dryness. The eggplant is ready once it's dry and chewy. You can put the extra eggplant jerky in Ziplock bags, sealing out the air and it will keep for about a month. You'll probably eat it up well before that!
Anyway, this is a good basic recipe and a marinade I use. Feel free to use your own imagination and taste to flavor the eggplant the way you like. Eggplant is very forgiving and accepts most any flavor you add. This is one of the qualities I really like about it!!
Please feel free to share the recipe with family and friends if you enjoy it. If you have any questions, you may email me at: stan.kain@gmail.com Please visit my recipe blog and try some of the healthy, easy and inexpensive recipes I share there. I really try to focus on healthy alternatives in cooking and sharing foods from many different cultures. Enjoy!!!
Monday, May 22, 2017
Awesome Crispy Chicken Wings
Okay, I'm the first one to admit that I've never been a fan of chicken wings. Most of the time, I just give them to the cats. I've tried them many ways, including soaked in some sort of sauce. I've never liked the texture of the skin, all the fat and grease, nor the overwhelming amount of sauce. There never seems to be a lot of flavor I like, either.
Recently, however, there's been a big change in the chicken wing attitude around here!!! Something I do like is very crispy skin on chicken and I much prefer baking or other means of preparing over frying. I fix a lot of baked and smoked chicken here....both are favorites.
I've found a little secret to preparing the most awesome chicken wings...ever!! So much so, I've been buying this bargain cut of chicken by the 4 pound bag!! It's simply become my favorite chicken meal and the flavor, texture and fat content is perfect, while the meat is juicy and delightful! Best of all, they are so easy to prepare!!! Perfect chicken wings is more a matter of simple preparation and cooking in a slightly different way than usual.
I'm going to share this great recipe with you, but remind you that following the instructions is absolutely essential to ending up with the best wings ever! Here we go!
INGREDIENTS
10 -12 Chicken Wings
1 Tablespoon Baking Powder
1/2 Teaspoon Salt
Dipping Sauce of your Choice (Optional)
PREPARATION
Make sure the wings are completely thawed if they've been frozen. Rinse them in plain water and let them rest at room temperature for about 30 minutes. Meanwhile, preheat the oven to 250 F degrees. Place a baking rack in a deep tray or dish so the wings are evenly heated and there is room for fat to drip without the wings being marinated in the removed fat.
The following is an IMPORTANT step! Place the chicken wings in a bowl and sprinkle 1 tablespoon of baking powder....NOT baking SODA!!! over the wings. Then, sprinkle 1/2 teaspoon of salt over the wings. This is about the right about for 10 -12 average chicken wings. Now, dive right in with your hands and mix the wings, baking powder and salt together so all are well mixed and the wings have all been in contact with the added ingredients. The baking powder and salt aren't meant to coat the chicken...just merely contact the skin. Take your time and make sure this step is done well.
Place the chicken wings onto the baking rack, allowing some space between them. Put the pan into the preheated oven.
COOKING
Allow the chicken wings to cook in the 250 F degree oven for 30 minutes. THIS IS A VERY IMPORTANT STEP! This step will not cook the wings, but will heat the fat in the wings, allowing it to melt and be removed from the wings. It will also allow the baking powder and salt to work on the chicken skin.
At the end of the 30 minutes, increase the temperature of the oven to 425 F degrees and cook the wings for another 40 minutes. At the end of the first 20 minutes, I suggest flipping the wings over in the baking pan, allowing for them to be more crispy in the end.
At the end of the 40 minute cook cycle, remove the wings from the oven and allow them to rest 5 minutes before serving. You will note that the skin on the wings is tight and crispy brown, while the wings are still juicy. There will be no rubbery chicken skin and fat on the finished wings.
Personally, I love them served just this way...right out of the oven! I've also found that they are great with a good barbecue sauce served as a dipping sauce. My Sweet and Sour Pineapple sauce is also a great dipping sauce. You'll find the recipe on my blog. You may also have your own favorite dipping sauce and I'm sure most any sauce would be delicious!
I really can't recommend this recipe enough! I hope you will give it a try! If you enjoy it, feel free to share with friends and family and let others know about your experience. If you have questions, please feel free to contact me at: stan.kain@gmail.com
Recently, however, there's been a big change in the chicken wing attitude around here!!! Something I do like is very crispy skin on chicken and I much prefer baking or other means of preparing over frying. I fix a lot of baked and smoked chicken here....both are favorites.
I've found a little secret to preparing the most awesome chicken wings...ever!! So much so, I've been buying this bargain cut of chicken by the 4 pound bag!! It's simply become my favorite chicken meal and the flavor, texture and fat content is perfect, while the meat is juicy and delightful! Best of all, they are so easy to prepare!!! Perfect chicken wings is more a matter of simple preparation and cooking in a slightly different way than usual.
I'm going to share this great recipe with you, but remind you that following the instructions is absolutely essential to ending up with the best wings ever! Here we go!
INGREDIENTS
10 -12 Chicken Wings
1 Tablespoon Baking Powder
1/2 Teaspoon Salt
Dipping Sauce of your Choice (Optional)
PREPARATION
Make sure the wings are completely thawed if they've been frozen. Rinse them in plain water and let them rest at room temperature for about 30 minutes. Meanwhile, preheat the oven to 250 F degrees. Place a baking rack in a deep tray or dish so the wings are evenly heated and there is room for fat to drip without the wings being marinated in the removed fat.
The following is an IMPORTANT step! Place the chicken wings in a bowl and sprinkle 1 tablespoon of baking powder....NOT baking SODA!!! over the wings. Then, sprinkle 1/2 teaspoon of salt over the wings. This is about the right about for 10 -12 average chicken wings. Now, dive right in with your hands and mix the wings, baking powder and salt together so all are well mixed and the wings have all been in contact with the added ingredients. The baking powder and salt aren't meant to coat the chicken...just merely contact the skin. Take your time and make sure this step is done well.
Place the chicken wings onto the baking rack, allowing some space between them. Put the pan into the preheated oven.
COOKING
Allow the chicken wings to cook in the 250 F degree oven for 30 minutes. THIS IS A VERY IMPORTANT STEP! This step will not cook the wings, but will heat the fat in the wings, allowing it to melt and be removed from the wings. It will also allow the baking powder and salt to work on the chicken skin.
At the end of the 30 minutes, increase the temperature of the oven to 425 F degrees and cook the wings for another 40 minutes. At the end of the first 20 minutes, I suggest flipping the wings over in the baking pan, allowing for them to be more crispy in the end.
At the end of the 40 minute cook cycle, remove the wings from the oven and allow them to rest 5 minutes before serving. You will note that the skin on the wings is tight and crispy brown, while the wings are still juicy. There will be no rubbery chicken skin and fat on the finished wings.
Personally, I love them served just this way...right out of the oven! I've also found that they are great with a good barbecue sauce served as a dipping sauce. My Sweet and Sour Pineapple sauce is also a great dipping sauce. You'll find the recipe on my blog. You may also have your own favorite dipping sauce and I'm sure most any sauce would be delicious!
I really can't recommend this recipe enough! I hope you will give it a try! If you enjoy it, feel free to share with friends and family and let others know about your experience. If you have questions, please feel free to contact me at: stan.kain@gmail.com
Thursday, April 13, 2017
Quick And Easy Asian Style Sweet And Sour Fruit Sauce
I always enjoy the sweet and sour fruit sauce at the Asian buffet restaurants. I love it for dipping chicken and even enjoy it over steamed rice. It's very easy to make at home, so I will also serve it with dishes I prepare. You can have a bowl of it ready in minutes and modify it to your own liking.
Here's an easy recipe you can put together in a matter of minutes. Don't hesitate to try it for dipping many different foods. I like it with Spring Rolls, as well.
INGREDIENTS
2/3 Cup Pineapple Juice (Canned or Frozen)
1/3 Cup Rice Vinegar
1/3 Cup Brown Sugar
3 Tablespoons Ketchup
1 Tablespoon Soy Sauce
1 Tablespoon Corn Starch
2 Tablespoons Water
PREPARATION
Put all ingredients, except the Corn Starch and water, in a saucepan on medium heat. While waiting for the ingredients to come to a boil, make a slurry mix of the corn starch and water.
Stir the saucepan as the sauce comes to a boil. As soon as it boils, add the corn starch slurry mix and stir. Continue at a slow boil until the sauce thickens from the corn starch. Depending upon your taste, this is where I modify my basic sauce. I will add slices of fresh banana or chunks of canned pineapple. I do this, just as soon as I have the sauce removed from the heat. Neither is necessary for a great sauce, but it's just a matter of taste.
Enjoy!
I hope you will give the sauce a try and use it with many of your Asian dishes. Please feel free to share the recipe with friends and family if you enjoy it! If you have any questions, you may email me at: stan.kain@gmail.com
Saturday, November 26, 2016
Asian Style Marinated Chicken
This is a very easy recipe for those who like Asian style chicken. It's certainly a big favorite around my house and there's nothing to preparing it. The greatest effort is remembering to prepare your marinade 12 to 24 hours ahead of time for cooking the chicken.
INGREDIENTS
2 Pounds of Chicken (Skin On - Use Thighs, Drumsticks or Breasts)
1/2 Cup Soy Sauce
1/4 Cup Brown Sugar (Packed in measuring cup)
3 Tablespoons Finely Chopped Fresh Ginger Root
1 Tablespoon Finely Chopped Fresh Garlic
1 Teaspoon Black Pepper
2 Teaspoons Sesame Oil
2 Tablespoons Honey
MARINADE
Put all ingredients except the chicken into an oven safe baking dish. Whisk until mixed completely.
PREPARATION
Place the pieces of chicken into the baking dish, making sure you turn them in the marinade so they are completely coated. Put the dish in the refrigerator and leave chicken to marinate for between 12 and 24 hours. Turn the chicken pieces at least once so the marinade works it's way evenly into the chicken.
COOKING
IMPORTANT!!! When preparing to cook the chicken, remove the oven safe baking dish from the refrigerator and allow it to warm up at room temperature for about half an hour, so it doesn't break going into the hot oven!!!
Preheat the oven to 475 F degrees. Make sure all of the chicken pieces are skin side up in the baking dish. Move an oven rack to the middle of the oven for baking. Place the baking dish into the oven and cook for about 40 minutes, or until the chicken is a dark brown in color.
When the chicken is baked, set the oven to Broil and place the baking dish under the broiler for between 3 and 5 minutes so the skin on the chicken will become crispy and dark in color.
Your chicken is ready to serve and is excellent with steamed rice as a side dish. Enjoy!!
If you have questions, you may email me at: stan.kain@gmail.com. You may also like to follow my recipe blog on Google +, so you get the latest recipes as I add them or make changes. Please share your experience with this dish, if you enjoy it, on G+ and feel free to share the recipe with friends and family.
INGREDIENTS
2 Pounds of Chicken (Skin On - Use Thighs, Drumsticks or Breasts)
1/2 Cup Soy Sauce
1/4 Cup Brown Sugar (Packed in measuring cup)
3 Tablespoons Finely Chopped Fresh Ginger Root
1 Tablespoon Finely Chopped Fresh Garlic
1 Teaspoon Black Pepper
2 Teaspoons Sesame Oil
2 Tablespoons Honey
MARINADE
Put all ingredients except the chicken into an oven safe baking dish. Whisk until mixed completely.
PREPARATION
Place the pieces of chicken into the baking dish, making sure you turn them in the marinade so they are completely coated. Put the dish in the refrigerator and leave chicken to marinate for between 12 and 24 hours. Turn the chicken pieces at least once so the marinade works it's way evenly into the chicken.
COOKING
IMPORTANT!!! When preparing to cook the chicken, remove the oven safe baking dish from the refrigerator and allow it to warm up at room temperature for about half an hour, so it doesn't break going into the hot oven!!!
Preheat the oven to 475 F degrees. Make sure all of the chicken pieces are skin side up in the baking dish. Move an oven rack to the middle of the oven for baking. Place the baking dish into the oven and cook for about 40 minutes, or until the chicken is a dark brown in color.
When the chicken is baked, set the oven to Broil and place the baking dish under the broiler for between 3 and 5 minutes so the skin on the chicken will become crispy and dark in color.
Your chicken is ready to serve and is excellent with steamed rice as a side dish. Enjoy!!
If you have questions, you may email me at: stan.kain@gmail.com. You may also like to follow my recipe blog on Google +, so you get the latest recipes as I add them or make changes. Please share your experience with this dish, if you enjoy it, on G+ and feel free to share the recipe with friends and family.
Sunday, November 20, 2016
What You Need To Know About Buying Beef....Save Money...Better Meat!
I find that people today seem to know little about buying beef....or at least are misinformed by advertising and a misunderstanding of meat safety. I want to share some information with you which will help you save money and get far better cuts of beef, no matter what cuts you are buying today. None of this information is really special, but things we have always known in the past. Sadly, the push today is for the meat industry to save expense by pushing lower quality meat through the market and our expense.
I come from a long line of cattle people....my great grandfather having owned the first butcher shop in Tucson, Arizona...back when it was still Arizona Territory. My grandfather was also a cattleman, specializing in show and breeding stock cattle. I grew up on a ranch, back in the 1940's and 50's where we raised beef cattle, as well. While we raised and sold commercial beef, we always butchered our own, as well and took the time to have the best.
I walk into the meat section in a grocery store today and look over the selection. It's just not the quality of meat in those neatly packaged little plastic packages I remember. Bright red, tough cuts of meat being pushed onto consumers and prices far above what it's really worth. It's all "fresh" beef...and you don't see a word about "aged" beef, unless you want to go to a specialty shop and pay three or four times the price of the grocery store. If you do, you won't see that bright red stuff in the package, either. Same if you're dining out. Go to an expensive, top quality steak house and order "aged beef." You'll pay the price and you'll see the difference!
So, what's the difference, you may ask. Well, this "fresh" meat you find advertised is straight from the slaughterhouse to the market. It's artificially processed to have that nice bright red color you've been told to seek. And it's so fresh, I always say, "they haven't even notified the next of kin yet." It's not good meat!!! It's tough and it lacks flavor.
"Aged beef," on the other hand, is tender, flavorful and a dark brown in color...not bright red. Why don't we get aged beef? It's expensive for the processing plants and grocery stores. Their profit lies in slaughtering the animal and selling the meat as quickly as possible. Properly aged beef has to be hung in a cool room for about 42 days before it's really at it's best and time is money. A poor quality cut of beef, properly aged...can be better than the best fresh Kansas City Strip Steak you can buy...if you know the secret to aging.
When I was a kid, we would slaughter one of our cattle for our own use. Lacking cold storage space at home, we would take the freshly slaughtered carcass to the butcher shop in town, which rented locker space for customers. The carcass was hung in a cool room....sawdust on the floor...for 42 days...then be cut up and packaged for our use. The carcass was not frozen but just kept cool. The meat would darken in color and often you would even see a coating of "fuzz" build up on the meat which was removed before being cut into steaks, roasts and other cuts for our use. Contrary to what you may have been led to believe, this is not harmful in the least!!
So, what does this all mean for you? Well, armed with knowledge, you can take advantage of advertising and misinformation to save money and dine on quality beef. I love going to the grocery store and looking at packages of fresh beef, all with little, "Use By" dates on the package. Generally, packages within a day or two of the code date are marked down...sometimes by up to half....and state it must be "used or frozen within a day or two." Often, you''ll note that the bright red color of the meat is fading to a darker tone. That's the beef you're looking to buy!! You're going to take it home, but you're not going to use it that day, nor are you going to freeze it! You're going to prepare quality aged beef to serve your family and once you try it, that's all you're going to want to have!
All you need is some spare space in the refrigerator....and once you get the hang of this, you may even want to pick up an old used refrigerator for the garage, just for aging beef, if you eat a lot of it. Oh, and salt! You're going to need a lot of salt!! Rock salt, pink Himalaya salt, whichever you prefer. And I'll be sharing another tip for tender beef, so you'll want a lot of coarse Kosher salt, as well. I promise you won't regret it!
First, let's get to the aging process. Bring your "soon to be out of date" beef home and fill a shallow dish with the rock salt or pink Himalayan salt. Set the meat on a rack, just above the level of the salt...the salt helps remove the moisture from the air around the beef. "Cool rooms" in commercial aging plants often have "salt walls" to help with this process and no, it won't make your cut of meat dry. Now, all you need is patience!!! Let that beef rest in the refrigerator for 42 days....time for it to properly age completely. That, "Use By" date is a joke! Don't take my word alone for it. Here's a great YouTube video which explains the entire process so you can see for yourself how it works. You're going to end up with very tender, high quality and flavorful meat to serve and enjoy. This is a process called, "dry aging," and there is another called "wet aging," but dry aging is easy to do.
Dry Aging Beef At Home
Now, here's another great tip for beef, if you want to quickly turn a tough cut of fresh beef into a tender and flavorful meal. Here's you're going to use the coarse Kosher salt and you'll only need about one hour for each inch of thickness of the beef you're using. You won't believe the difference! And no, the beef will not be salty when you finish...the salt stays on the surface of the meat and you wash it off before cooking. The salt merely seals the meat and breaks down the fibers of the meat, making it very tender. Forget about buying meat tenderizer....this works way better!!! Here's a short video giving you a comparison between a plain fresh cut of cheap beef and a the same piece of meat which has been through the salting process. Trust me, my kitchen is well stocked with salt!
Tenderize A Cheap Cut Of Beef In One Hour!
I really hope you will enjoy this information and give it a try. You can save a lot of money when buying beef at the high prices today and actually end up enjoying the beef you serve. It's a process used for many, many years in the industry before profit became the key motivation. Back when people demanded quality.
If you have questions, please feel free to email me at: stan.kain@gmail.com You may also follow my recipe blog here. Please share your experiences with my recipes and tips, if you enjoy the result. And, feel free to share with family and friends!!!
I come from a long line of cattle people....my great grandfather having owned the first butcher shop in Tucson, Arizona...back when it was still Arizona Territory. My grandfather was also a cattleman, specializing in show and breeding stock cattle. I grew up on a ranch, back in the 1940's and 50's where we raised beef cattle, as well. While we raised and sold commercial beef, we always butchered our own, as well and took the time to have the best.
I walk into the meat section in a grocery store today and look over the selection. It's just not the quality of meat in those neatly packaged little plastic packages I remember. Bright red, tough cuts of meat being pushed onto consumers and prices far above what it's really worth. It's all "fresh" beef...and you don't see a word about "aged" beef, unless you want to go to a specialty shop and pay three or four times the price of the grocery store. If you do, you won't see that bright red stuff in the package, either. Same if you're dining out. Go to an expensive, top quality steak house and order "aged beef." You'll pay the price and you'll see the difference!
So, what's the difference, you may ask. Well, this "fresh" meat you find advertised is straight from the slaughterhouse to the market. It's artificially processed to have that nice bright red color you've been told to seek. And it's so fresh, I always say, "they haven't even notified the next of kin yet." It's not good meat!!! It's tough and it lacks flavor.
"Aged beef," on the other hand, is tender, flavorful and a dark brown in color...not bright red. Why don't we get aged beef? It's expensive for the processing plants and grocery stores. Their profit lies in slaughtering the animal and selling the meat as quickly as possible. Properly aged beef has to be hung in a cool room for about 42 days before it's really at it's best and time is money. A poor quality cut of beef, properly aged...can be better than the best fresh Kansas City Strip Steak you can buy...if you know the secret to aging.
When I was a kid, we would slaughter one of our cattle for our own use. Lacking cold storage space at home, we would take the freshly slaughtered carcass to the butcher shop in town, which rented locker space for customers. The carcass was hung in a cool room....sawdust on the floor...for 42 days...then be cut up and packaged for our use. The carcass was not frozen but just kept cool. The meat would darken in color and often you would even see a coating of "fuzz" build up on the meat which was removed before being cut into steaks, roasts and other cuts for our use. Contrary to what you may have been led to believe, this is not harmful in the least!!
So, what does this all mean for you? Well, armed with knowledge, you can take advantage of advertising and misinformation to save money and dine on quality beef. I love going to the grocery store and looking at packages of fresh beef, all with little, "Use By" dates on the package. Generally, packages within a day or two of the code date are marked down...sometimes by up to half....and state it must be "used or frozen within a day or two." Often, you''ll note that the bright red color of the meat is fading to a darker tone. That's the beef you're looking to buy!! You're going to take it home, but you're not going to use it that day, nor are you going to freeze it! You're going to prepare quality aged beef to serve your family and once you try it, that's all you're going to want to have!
All you need is some spare space in the refrigerator....and once you get the hang of this, you may even want to pick up an old used refrigerator for the garage, just for aging beef, if you eat a lot of it. Oh, and salt! You're going to need a lot of salt!! Rock salt, pink Himalaya salt, whichever you prefer. And I'll be sharing another tip for tender beef, so you'll want a lot of coarse Kosher salt, as well. I promise you won't regret it!
First, let's get to the aging process. Bring your "soon to be out of date" beef home and fill a shallow dish with the rock salt or pink Himalayan salt. Set the meat on a rack, just above the level of the salt...the salt helps remove the moisture from the air around the beef. "Cool rooms" in commercial aging plants often have "salt walls" to help with this process and no, it won't make your cut of meat dry. Now, all you need is patience!!! Let that beef rest in the refrigerator for 42 days....time for it to properly age completely. That, "Use By" date is a joke! Don't take my word alone for it. Here's a great YouTube video which explains the entire process so you can see for yourself how it works. You're going to end up with very tender, high quality and flavorful meat to serve and enjoy. This is a process called, "dry aging," and there is another called "wet aging," but dry aging is easy to do.
Dry Aging Beef At Home
Now, here's another great tip for beef, if you want to quickly turn a tough cut of fresh beef into a tender and flavorful meal. Here's you're going to use the coarse Kosher salt and you'll only need about one hour for each inch of thickness of the beef you're using. You won't believe the difference! And no, the beef will not be salty when you finish...the salt stays on the surface of the meat and you wash it off before cooking. The salt merely seals the meat and breaks down the fibers of the meat, making it very tender. Forget about buying meat tenderizer....this works way better!!! Here's a short video giving you a comparison between a plain fresh cut of cheap beef and a the same piece of meat which has been through the salting process. Trust me, my kitchen is well stocked with salt!
Tenderize A Cheap Cut Of Beef In One Hour!
I really hope you will enjoy this information and give it a try. You can save a lot of money when buying beef at the high prices today and actually end up enjoying the beef you serve. It's a process used for many, many years in the industry before profit became the key motivation. Back when people demanded quality.
If you have questions, please feel free to email me at: stan.kain@gmail.com You may also follow my recipe blog here. Please share your experiences with my recipes and tips, if you enjoy the result. And, feel free to share with family and friends!!!
Thursday, November 17, 2016
Let's Roast A Perfect Turkey
Well, we're on the countdown now for Thanksgiving and it takes time to prepare the perfect turkey, so I think we should get started. I want to share my way of making sure everyone truly enjoys the Thanksgiving bird for dinner.
Most likely, your turkey is frozen, as is mine. So, we should think ahead. An average size turkey...say 14 -16 pounds, is going to need to be removed from the freezer and placed into the refrigerator for two days so it may thaw slowly. Let's note that on the calendar!! Nothing worse than trying to work with a half frozen turkey! Of course, if you're a bit late and the turkey isn't completely thawed, you can always immerse it in cold water for a few hours and finish the thawing. Just leave the turkey in the sealed plastic wrap to make sure water doesn't get inside while the turkey is immersed.
Once the turkey is thawed, we'll move onto the next step, which you may not be familiar with doing, but will greatly enhance the bird! And we're going to need an additional day, so make sure that turkey is thawed in time!!
The morning before Thanksgiving, remove the thawed turkey from the refrigerator. Now, remove the turkey from the plastic wrap and rinse the turkey under cold water. Rinse the inside and outside of the turkey and don't forget to remove the package of giblets packed inside the turkey! I don't know how many people have managed to cook that little package inside the turkey, not realizing it's there! If you boil those giblets before making your stuffing...dice them up and add them to the stuffing mix...it's a nice addition, too. Or if you have cats, they sure love the boiled giblets, if you don't want to use them.
Now that you have the turkey all rinsed and dried, we're going to carefully loosen the skin from the meat on the breast and legs of the turkey. Be gentle and try to not tear the skin. Go slowly while doing this, separating the thin membrane separating the meat from the skin.
Take a small mixing bowl and pour in a generous amount of KOSHER SALT. Only use kosher salt, as it is much coarser than regular table salt. Now, you may add some pepper and seasonings of your choice to the kosher salt...Rosemary, Basil...whatever you like. Mix the salt, pepper and seasonings together. Pat the turkey down well to remove any moisture from the surfaces..you can use papere towels to do this. Take about 2 teaspoons of the salt/seasoning mixture and rub it all over the inside cavity of the turkey, using your hands. Make sure you thoroughly rub all surfaces. Now, using another 2 teaspoons of the salt/seasoning mix, lift the skin of the turkey and rub the breast meat and leg meat with the mixture. Again, rubbing all surfaces and being gentle so as to not tear the skin. When finished, pull the skin back into place on the turkey and follow the same procedure, rubbing the salt/seasoning mixture onto the surface of the turkey skin. Rub well into the area between the legs and body of the turkey and the wings, as well. Now, put the turkey back into the refrigerator, uncovered....until the following morning when you are ready to stuff and roast the bird.
Before stuffing the bird, remove it from the refrigerator and pat all surfaces dry....very dry. Remember to pat down the cavity inside the bird, as well.
NOTE: Don't worry about the salt you put on the turkey!!! It's not going to make it too salty! And when you pat the bird dry, the excess salt will be removed. Here's what this brine treatment is going to do. It's going to assure you that your turkey will be moist and juicy after you roast it...not all dried out....and it's going to assure you that the skin on the roasted bird is going to be very crispy and nice!
Now, you're free to stuff the bird with your favorite type of stuffing. I like to use a very moist stuffing mix...not too dry.
With the turkey stuffed and ready to go, I melt butter in a saucepan. I use a syringe type baster/injector and infuse the breast and legs with the melted butter. Inject deeply into the meat and slowly, moving around with the needle to get good dispersal of melted butter into the meat.
Now, I preheat the oven to 425 F degrees, with the cooking rack being set in the bottom 1/3 of the oven. I like clean up to be simple, so I always use one of the disposable aluminum pans for roasting the turkey. And, helping maintain moisture in the bird, I also put the bird inside one of those roasting bags before placing it into the aluminum pan. Again, clean up is easy and the bird stays moist. Seal the roasting bag and reduce the temperature in the oven to 350 F degrees. Place the turkey into the oven and begin roasting. The rule of thumb is to allow about 13 minutes per pound for your turkey to adequately roast.
For safety sake, make sure you have a meat thermometer handy. Check the legs and breast of the turkey, plunging the meat thermometer deeply into the meat to make sure the internal temperature reaches 165 F degrees. Do the same with the stuffing inside the turkey. You want to see 165 F degrees there, as well. This way, you know all bacteria has been killed and your guests are going to enjoy your turkey dinner instead of food poisoning!!!
Once the turkey is ready, I cut the roasting bag open along the top, exposing the breast, legs and wings. I like very crispy skin on the turkey...one of my favorite parts of the meal, so I brush the skin on the breast, legs and wings with more melted butter. I put the turkey back into the oven for about 20 minutes, allowing the skin to thoroughly brown and become more crispy. Once done, out of the oven!
Allow about 20 minutes for the turkey to "rest" after coming out of the oven before you carve it. That will allow all the juices time to settle and surface and the turkey will carve much more easily! Ready to serve!!
That's it...a perfect Thanksgiving turkey, my way. I hope you enjoy and remember, if you roast a chicken during the year, the same process works wonderfully there, as well.
If you have any questions, feel free to email me at: stan.kain@gmail.com You may also follow my recipe blog here on G+ for updates and more recipes. And share your experience on G+ if you try my methods and recipes and also share with family and friends!!
Most likely, your turkey is frozen, as is mine. So, we should think ahead. An average size turkey...say 14 -16 pounds, is going to need to be removed from the freezer and placed into the refrigerator for two days so it may thaw slowly. Let's note that on the calendar!! Nothing worse than trying to work with a half frozen turkey! Of course, if you're a bit late and the turkey isn't completely thawed, you can always immerse it in cold water for a few hours and finish the thawing. Just leave the turkey in the sealed plastic wrap to make sure water doesn't get inside while the turkey is immersed.
Once the turkey is thawed, we'll move onto the next step, which you may not be familiar with doing, but will greatly enhance the bird! And we're going to need an additional day, so make sure that turkey is thawed in time!!
The morning before Thanksgiving, remove the thawed turkey from the refrigerator. Now, remove the turkey from the plastic wrap and rinse the turkey under cold water. Rinse the inside and outside of the turkey and don't forget to remove the package of giblets packed inside the turkey! I don't know how many people have managed to cook that little package inside the turkey, not realizing it's there! If you boil those giblets before making your stuffing...dice them up and add them to the stuffing mix...it's a nice addition, too. Or if you have cats, they sure love the boiled giblets, if you don't want to use them.
Now that you have the turkey all rinsed and dried, we're going to carefully loosen the skin from the meat on the breast and legs of the turkey. Be gentle and try to not tear the skin. Go slowly while doing this, separating the thin membrane separating the meat from the skin.
Take a small mixing bowl and pour in a generous amount of KOSHER SALT. Only use kosher salt, as it is much coarser than regular table salt. Now, you may add some pepper and seasonings of your choice to the kosher salt...Rosemary, Basil...whatever you like. Mix the salt, pepper and seasonings together. Pat the turkey down well to remove any moisture from the surfaces..you can use papere towels to do this. Take about 2 teaspoons of the salt/seasoning mixture and rub it all over the inside cavity of the turkey, using your hands. Make sure you thoroughly rub all surfaces. Now, using another 2 teaspoons of the salt/seasoning mix, lift the skin of the turkey and rub the breast meat and leg meat with the mixture. Again, rubbing all surfaces and being gentle so as to not tear the skin. When finished, pull the skin back into place on the turkey and follow the same procedure, rubbing the salt/seasoning mixture onto the surface of the turkey skin. Rub well into the area between the legs and body of the turkey and the wings, as well. Now, put the turkey back into the refrigerator, uncovered....until the following morning when you are ready to stuff and roast the bird.
Before stuffing the bird, remove it from the refrigerator and pat all surfaces dry....very dry. Remember to pat down the cavity inside the bird, as well.
NOTE: Don't worry about the salt you put on the turkey!!! It's not going to make it too salty! And when you pat the bird dry, the excess salt will be removed. Here's what this brine treatment is going to do. It's going to assure you that your turkey will be moist and juicy after you roast it...not all dried out....and it's going to assure you that the skin on the roasted bird is going to be very crispy and nice!
Now, you're free to stuff the bird with your favorite type of stuffing. I like to use a very moist stuffing mix...not too dry.
With the turkey stuffed and ready to go, I melt butter in a saucepan. I use a syringe type baster/injector and infuse the breast and legs with the melted butter. Inject deeply into the meat and slowly, moving around with the needle to get good dispersal of melted butter into the meat.
Now, I preheat the oven to 425 F degrees, with the cooking rack being set in the bottom 1/3 of the oven. I like clean up to be simple, so I always use one of the disposable aluminum pans for roasting the turkey. And, helping maintain moisture in the bird, I also put the bird inside one of those roasting bags before placing it into the aluminum pan. Again, clean up is easy and the bird stays moist. Seal the roasting bag and reduce the temperature in the oven to 350 F degrees. Place the turkey into the oven and begin roasting. The rule of thumb is to allow about 13 minutes per pound for your turkey to adequately roast.
For safety sake, make sure you have a meat thermometer handy. Check the legs and breast of the turkey, plunging the meat thermometer deeply into the meat to make sure the internal temperature reaches 165 F degrees. Do the same with the stuffing inside the turkey. You want to see 165 F degrees there, as well. This way, you know all bacteria has been killed and your guests are going to enjoy your turkey dinner instead of food poisoning!!!
Once the turkey is ready, I cut the roasting bag open along the top, exposing the breast, legs and wings. I like very crispy skin on the turkey...one of my favorite parts of the meal, so I brush the skin on the breast, legs and wings with more melted butter. I put the turkey back into the oven for about 20 minutes, allowing the skin to thoroughly brown and become more crispy. Once done, out of the oven!
Allow about 20 minutes for the turkey to "rest" after coming out of the oven before you carve it. That will allow all the juices time to settle and surface and the turkey will carve much more easily! Ready to serve!!
That's it...a perfect Thanksgiving turkey, my way. I hope you enjoy and remember, if you roast a chicken during the year, the same process works wonderfully there, as well.
If you have any questions, feel free to email me at: stan.kain@gmail.com You may also follow my recipe blog here on G+ for updates and more recipes. And share your experience on G+ if you try my methods and recipes and also share with family and friends!!
Monday, November 14, 2016
Hot Smoked Mackerel
This morning's project has been smoking some freshly frozen Mackerel I picked up yesterday at the Asian market. They have a lot of fish you don't normally find in regular stores...and it's right out of the ocean into ice...so you bring them home frozen, clean them and use them as you wish. And, they sell fish very cheap! These three nice fish cost me $6.00. Gutted them, removed the heads...then packed them in rock salt in the refrigerator to cure....wash off the salt, let them set up...then into the smoker with wet Hickory chips. Low heat and a lot of smoke...and you can see the finished product! They look and smell wonderful!
 |
| Mackerel ready to be cleaned and heads removed |
 |
| Packed with coarse salt to cure in the refrigerator |
 |
| Into the smoker with wet Hickory chips on a hot bed of coals |
 |
| And the finished smoked Mackerel ready to be eaten or stored |
Vegetarian French Dip Sandwich
As you've probably come to recognize, if you follow my recipes, I'm a big fan of sandwiches and Portobello mushrooms. Here's another great one I think you will enjoy.
INGREDIENTS
3 Portobello Mushroom caps
1 Medium White Onion
1 Cup Vegetable Broth
2 Sandwich Rolls (6 inch)
4 Slices Provolone Cheese
2 Cloves Garlic (minced)
2 Tablespooons Olive Oil
1 Tablespoon Soy Sauce
1 Tablespoon Worcester Sauce
1/2 Teaspoon Thyme
1/4 Teaspoon Liquid Smoke
1/4 Teaspoon Black Pepper
Horseradish Mustard
PREPARATION
Thin slice the Portobello mushroom caps into strips. Slice the White Onion into rings, then cut the rings in half. Mince the cloves of Garlic.
Put 1 tablespoon of Olive Oil into a skillet. Add the onion rings on low-medium heat and stir occasionally until the onions are cooked and transparent. Once the onions are done, add the minced garlic and cook for an additional two minutes...continuing to occasionally stir. Remove the onions and garlic, putting them on a separate plate.
Add another tablespoon of Olive Oil to the skillet, increase the heat to medium and add the Portobello mushroom slices. Cook them for about 5 minutes until they start to brown. Turn the mushroom slices over and cook an additional 5 minutes on the other side.
Now, add the cooked onion rings to the skillet, with the mushroom slices. Add the vegetable broth, Worcester sauce, Soy sauce, Thyme, Liquid Smoke and black pepper. Bring to a simmer, and continue to stir and cook for about 5 minutes, until the liquid is reduced to about half what you started with.
Now, open the Sandwich rolls and spread the Horseradish Mustard on the inside surfaces of the buns. Using a slotted spoon so you can drain the mushroom/onion mix and divide up the mushrooms and onions onto the inside of the sandwich roll. You may press lightly on the mushroom/onion mix to remove as much juice as you can before spreading them onto the buns. Place the Provolone Cheese on top of the mushroom/onion mix and place the open face buns under the broiler, just long enough for the cheese to melt. Remove from the broiler and close the sandwich up to serve. You may elect to slice the buns in half, making 2 3 inch long pieces.

Take the juice in the skillet and pour into cups to use as dipping juice for the sandwiches. Enjoy!!
I hope you enjoy these sandwiches. If you have any questions, please email me at: stan.kain@gmail.com You may also subscribe to follow my recipe blog. And, please share on G+ if you enjoyed the recipe and share it with family and friends, as well!
INGREDIENTS
3 Portobello Mushroom caps
1 Medium White Onion
1 Cup Vegetable Broth
2 Sandwich Rolls (6 inch)
4 Slices Provolone Cheese
2 Cloves Garlic (minced)
2 Tablespooons Olive Oil
1 Tablespoon Soy Sauce
1 Tablespoon Worcester Sauce
1/2 Teaspoon Thyme
1/4 Teaspoon Liquid Smoke
1/4 Teaspoon Black Pepper
Horseradish Mustard
PREPARATION
Thin slice the Portobello mushroom caps into strips. Slice the White Onion into rings, then cut the rings in half. Mince the cloves of Garlic.
Put 1 tablespoon of Olive Oil into a skillet. Add the onion rings on low-medium heat and stir occasionally until the onions are cooked and transparent. Once the onions are done, add the minced garlic and cook for an additional two minutes...continuing to occasionally stir. Remove the onions and garlic, putting them on a separate plate.
Add another tablespoon of Olive Oil to the skillet, increase the heat to medium and add the Portobello mushroom slices. Cook them for about 5 minutes until they start to brown. Turn the mushroom slices over and cook an additional 5 minutes on the other side.
Now, add the cooked onion rings to the skillet, with the mushroom slices. Add the vegetable broth, Worcester sauce, Soy sauce, Thyme, Liquid Smoke and black pepper. Bring to a simmer, and continue to stir and cook for about 5 minutes, until the liquid is reduced to about half what you started with.
Now, open the Sandwich rolls and spread the Horseradish Mustard on the inside surfaces of the buns. Using a slotted spoon so you can drain the mushroom/onion mix and divide up the mushrooms and onions onto the inside of the sandwich roll. You may press lightly on the mushroom/onion mix to remove as much juice as you can before spreading them onto the buns. Place the Provolone Cheese on top of the mushroom/onion mix and place the open face buns under the broiler, just long enough for the cheese to melt. Remove from the broiler and close the sandwich up to serve. You may elect to slice the buns in half, making 2 3 inch long pieces.

Take the juice in the skillet and pour into cups to use as dipping juice for the sandwiches. Enjoy!!
I hope you enjoy these sandwiches. If you have any questions, please email me at: stan.kain@gmail.com You may also subscribe to follow my recipe blog. And, please share on G+ if you enjoyed the recipe and share it with family and friends, as well!
Saturday, November 5, 2016
Another Great "One Pot" Italian Dinner
I've had a lot of really positive feedback on the Italian "One Pot" dinner recipe in the recipe blog. Simple, quick, inexpensive and healthy....as well as vegetarian. Since it's been so popular, I thought I would offer another variant to it you may enjoy.
INGREDIENTS
12 Ounces Thin Spaghetti
12 Ounces Fresh Cherry Tomatoes
4 1/2 Cups Water
1 Medium White Onion
1 Cup Sliced Fresh Mushrooms
1 Cup Frozen Spinach
4 Cloves Garlic
2 Tablespoons Olive Oil
1 Tablespoon Dried Oregano
1 Tablespoon Dried Basil
Salt to taste
Black Pepper to taste
Parmesan Cheese (Dry Shredded)
PREPARATION
We're going to use a large, deep skillet to prepare this dish. Add water and spaghetti to the skillet, together with the Oregano, Basil, Salt and Pepper. After thinly slicing the onion into rings, add them to the skillet. Cut the Cherry Tomatoes in half and add them, as well. Finely chop the cloves of Garlic, or if you prefer, use minced garlic and add that to the skillet. Now, add the thinly sliced Mushrooms to the rest of the ingredients.
Heat the skillet on a burner with Medium High heat, bringing the ingredients to a boil. Stir occasionally to mix the ingredients and keep the pasta from sticking to the bottom of the skillet. Make sure you turn and separate the pasta so it doesn't stick together. At a brisk boil, the water will evaporate, the pasta will become al dente in about 10 minutes. Remove the skillet from the heat and add the frozen spinach, mixing it into the rest of the ingredients.
Place servings into platters and generously sprinkle with the grated Parmesan Cheese. A delicious, filling meal ready in a matter of minutes! Enjoy!
If you have questions, please feel free to email me at: stan.kain@gmail.com You may also follow my recipes on the Recipe Blog. And, be sure to share if you enjoyed the meal and share the recipe with family and friends!
INGREDIENTS
12 Ounces Thin Spaghetti
12 Ounces Fresh Cherry Tomatoes
4 1/2 Cups Water
1 Medium White Onion
1 Cup Sliced Fresh Mushrooms
1 Cup Frozen Spinach
4 Cloves Garlic
2 Tablespoons Olive Oil
1 Tablespoon Dried Oregano
1 Tablespoon Dried Basil
Salt to taste
Black Pepper to taste
Parmesan Cheese (Dry Shredded)
PREPARATION
We're going to use a large, deep skillet to prepare this dish. Add water and spaghetti to the skillet, together with the Oregano, Basil, Salt and Pepper. After thinly slicing the onion into rings, add them to the skillet. Cut the Cherry Tomatoes in half and add them, as well. Finely chop the cloves of Garlic, or if you prefer, use minced garlic and add that to the skillet. Now, add the thinly sliced Mushrooms to the rest of the ingredients.
Heat the skillet on a burner with Medium High heat, bringing the ingredients to a boil. Stir occasionally to mix the ingredients and keep the pasta from sticking to the bottom of the skillet. Make sure you turn and separate the pasta so it doesn't stick together. At a brisk boil, the water will evaporate, the pasta will become al dente in about 10 minutes. Remove the skillet from the heat and add the frozen spinach, mixing it into the rest of the ingredients.
Place servings into platters and generously sprinkle with the grated Parmesan Cheese. A delicious, filling meal ready in a matter of minutes! Enjoy!
If you have questions, please feel free to email me at: stan.kain@gmail.com You may also follow my recipes on the Recipe Blog. And, be sure to share if you enjoyed the meal and share the recipe with family and friends!
Friday, November 4, 2016
Easy Greek Chicken Dinner
This is a delicious, healthy and easy to prepare dinner, using just one baking sheet. If you marinate the chicken ahead of time, you can have dinner on the table in about half an hour. Enjoy a mild Greek flavor to the dinner table.
INGREDIENTS
12 Ounces Baby Red Potatoes
12 Ounces Fresh Asparagus (or Green Beans)
6 Chicken Thighs (Bone in/Skin On)
1/4 Cup Olive Oil
3 Garlic Cloves
Juice from 1 Lemon
1 Tablespoon Red Wine Vinegar
1 Tablespoon Oregano
Kosher Salt to taste
Black Pepper to taste
1 Tablespoon Parsley
MARINADE
Prepare a marinade, using a large zip lock plastic bag. Pour the marinade, consisting of the Olive Oil, minced Garlic Cloves, Lemon Juice, Red Wine Vinegar, Oregano and Salt and Pepper to taste. Add the chicken thighs to the bag, mix well in marinade and place in the refrigerator for at least one hour. Turn the bag occasionally to ensure the chicken thighs are thoroughly marinated.
PREPARATION
Wash and cut the Red Potatoes in half. Place them, flat side down on a baking sheet which has been sprayed with non-stick oil. Arrange the Asparagus between and around the potatoes, forming a single layer of vegetables. Now drizzle some Olive Oil over the potatoes and Asparagus, as well as salt and pepper to taste. Remove the chicken thighs from the marinade and place them on top of the layer of vegetables in a single layer.
Preheat the oven to 375 F degrees and place the baking sheet into the oven for about 30 minutes, or until the chicken is cooked through. When the thighs are completely cooked, move the baking sheet under the broiler and broil for about 5 minutes or until the skin on the chicken thighs is crispy and slightly blackened.
Place chicken and vegetables on a serving dish, topping with parsley for a pleasing appearance. Ready to serve!
I hope you will enjoy this quick and inexpensive meal. It's certainly one I enjoy around here. If you have questions, please feel free to email me at: stan.kain@gmail.com You may also follow my Recipe Blog on Google+ for the latest updates and new recipes as I add them. If you enjoy the meal, please share on G+ and share with friends and family!
INGREDIENTS
12 Ounces Baby Red Potatoes
12 Ounces Fresh Asparagus (or Green Beans)
6 Chicken Thighs (Bone in/Skin On)
1/4 Cup Olive Oil
3 Garlic Cloves
Juice from 1 Lemon
1 Tablespoon Red Wine Vinegar
1 Tablespoon Oregano
Kosher Salt to taste
Black Pepper to taste
1 Tablespoon Parsley
MARINADE
Prepare a marinade, using a large zip lock plastic bag. Pour the marinade, consisting of the Olive Oil, minced Garlic Cloves, Lemon Juice, Red Wine Vinegar, Oregano and Salt and Pepper to taste. Add the chicken thighs to the bag, mix well in marinade and place in the refrigerator for at least one hour. Turn the bag occasionally to ensure the chicken thighs are thoroughly marinated.
PREPARATION
Wash and cut the Red Potatoes in half. Place them, flat side down on a baking sheet which has been sprayed with non-stick oil. Arrange the Asparagus between and around the potatoes, forming a single layer of vegetables. Now drizzle some Olive Oil over the potatoes and Asparagus, as well as salt and pepper to taste. Remove the chicken thighs from the marinade and place them on top of the layer of vegetables in a single layer.
Preheat the oven to 375 F degrees and place the baking sheet into the oven for about 30 minutes, or until the chicken is cooked through. When the thighs are completely cooked, move the baking sheet under the broiler and broil for about 5 minutes or until the skin on the chicken thighs is crispy and slightly blackened.
Place chicken and vegetables on a serving dish, topping with parsley for a pleasing appearance. Ready to serve!
I hope you will enjoy this quick and inexpensive meal. It's certainly one I enjoy around here. If you have questions, please feel free to email me at: stan.kain@gmail.com You may also follow my Recipe Blog on Google+ for the latest updates and new recipes as I add them. If you enjoy the meal, please share on G+ and share with friends and family!
Subscribe to:
Posts (Atom)